There’s nothing quite like the joy of cooking and entertaining outdoors. The fresh air, natural light, and laidback vibes make alfresco dining a magical experience. If you love spending time outside grilling, sipping cocktails, or having meals with family and friends, then an outdoor kitchen is a must-have addition for your home.
While you can always purchase a prefabricated outdoor kitchen unit, there’s something extra satisfying about designing and building one yourself from the ground up. This allows you to fully customize the space to suit your lifestyle, needs, and aesthetic tastes. The outdoor kitchen frame serves as the foundation for your DIY project and is surprisingly straightforward to construct.
Planning Your Outdoor Kitchen Frame
The first step in any construction project is thoughtful planning and preparation. Building an outdoor kitchen frame requires factoring in practical considerations as well as your design vision.
Determining Your Needs
Before drawing up plans, carefully evaluate how you want to use your outdoor cooking space. This will dictate the frame size and features needed.
Consider available yard space – what are the maximum dimensions for your frame? Account for surface areas needed for grilling, prep work, and seating. For example, allow for 4-6 feet of countertop per appliance or sink. An L-shaped or U-shaped design is space-efficient.
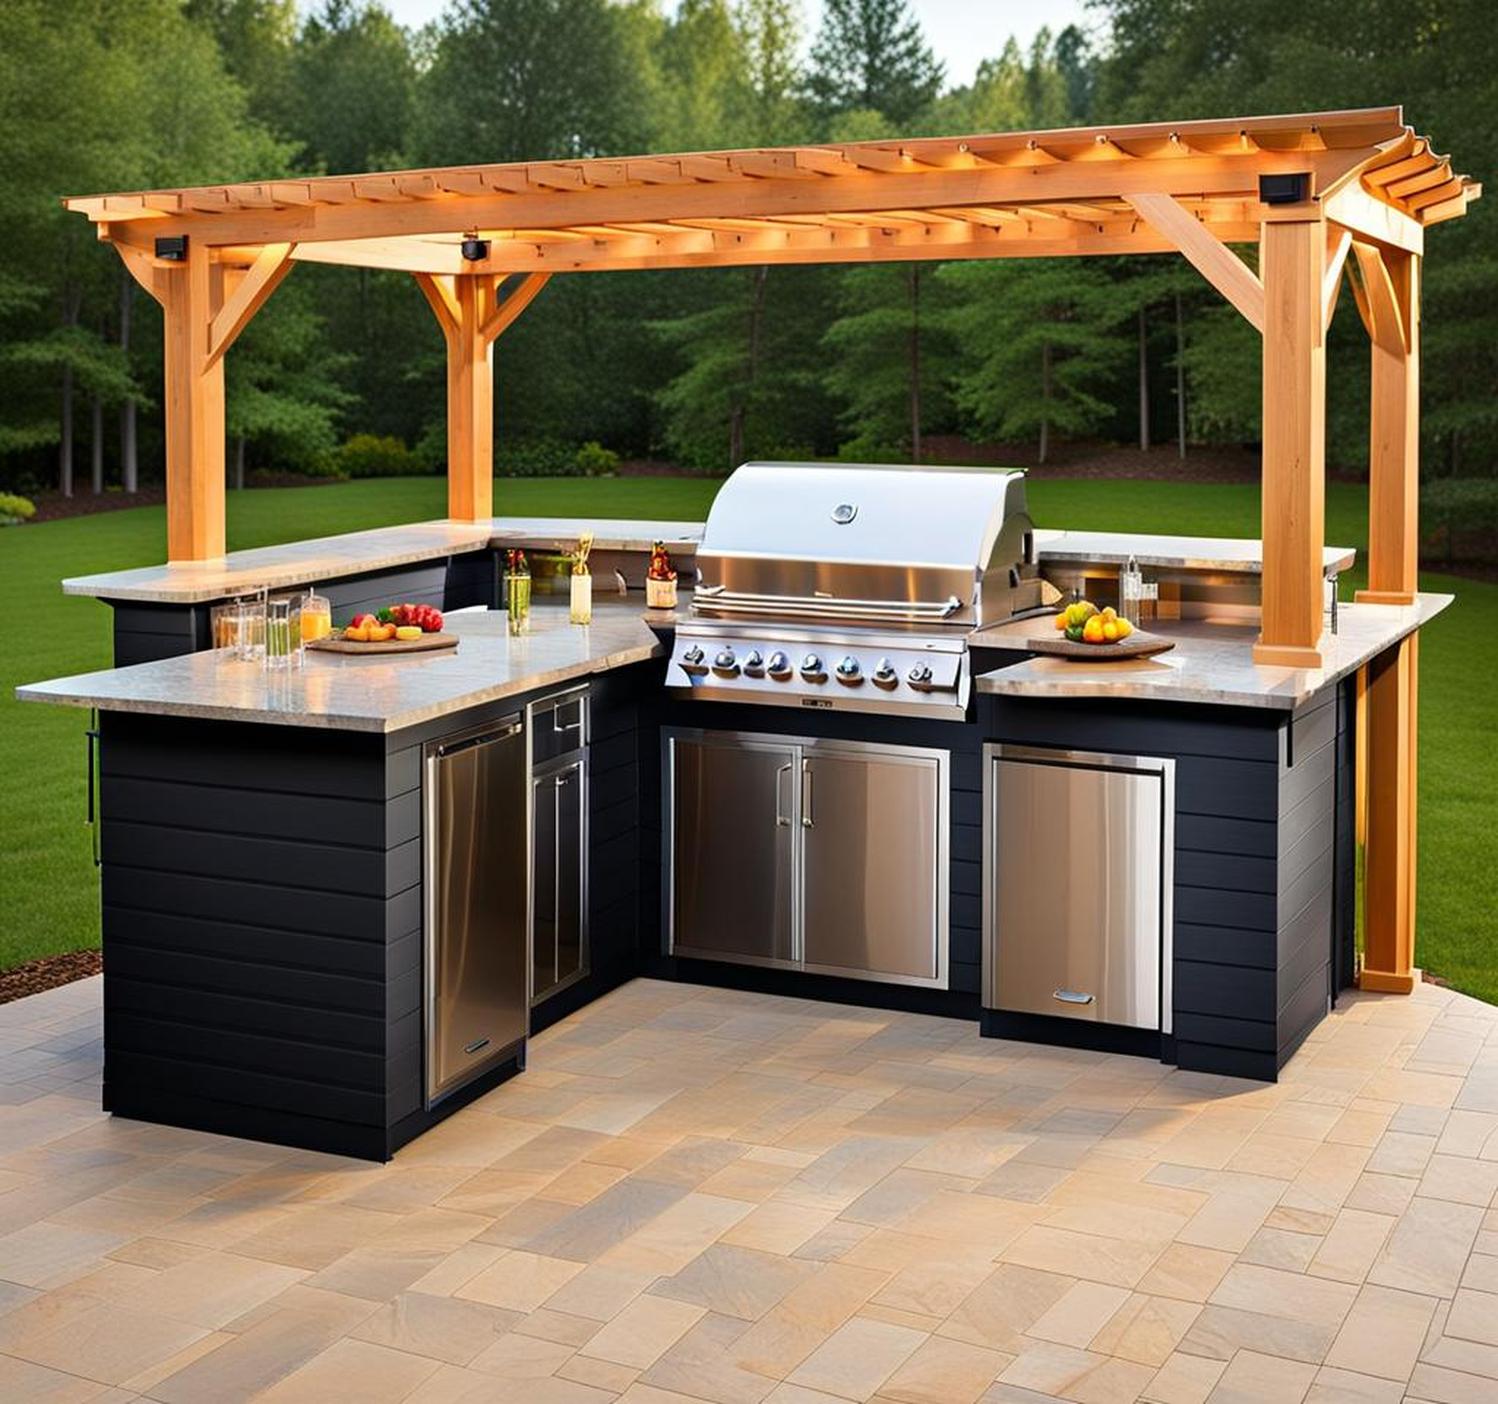
Decide which components are must-haves, like a high-powered grill or beverage center. Optional features could include a pizza oven, wok range, or smoker. The frame design must accommodate your desired appliances.
Set a realistic budget so you can select suitable materials and finishes. Simple lumber frames are budget-friendly, while natural stone elevates the look.
Think about your overall style – minimalist contemporary or rustic farmhouse? Opt for a cohesive aesthetic in your materials, colors, and accents.
Designing the Layout
With your needs and preferences considered, start designing the frame layout.
Arrange appliances and furnishings in a functional sequence that also allows multiple people to cook comfortably. Allow clear paths for traffic flow.
Island frames need open access on all sides. An L-shaped frame tucked against the house is space-efficient. A straight counter frame maximizes seating.
Ensure adequate clearance is left for appliance doors, drawers, and grilling lids to fully open. Cutouts will be needed.
Check local building codes for any requirements around proximity to the home, outlets, ventilation, and more.
Create a scale drawing of your floor plan to visualize spacing. This will be used to calculate measurements.
Outdoor Kitchen Frame Construction
With design and planning complete, it’s time to start constructing the all-important frame. This provides underlying support that everything else is built upon.
Frame Basics
The frame should create a flat, level, and sturdy foundation for cabinetry, countertops, and heavy appliances like a grill or refrigerator. Sturdy framing is essential for durability.
Pressure-treated lumber is ideal for the frame since it stands up well to moisture and insects. Cedar and redwood also resist rotting but are pricier.
Use corrosion-resistant hardware like galvanized deck screws. Apply additional water-sealant on the lumber for protection.
Incorporate support crossbeams, robust corner joints, anchoring to the ground, and other reinforcement techniques for optimal stability.
Leveling is crucial – improper leveling will make installing cabinets and countertops incredibly challenging.
Building the Base
Cover your framed platform with a proper subbase that allows for drainage. This prevents water pooling under the frame.
A 4-6 inch gravel base topped with sand or paver stones works well. This also helps level the frame on uneven ground.
For permanent structures, pouring a concrete slab base allows secure anchoring. Use rebar or anchor bolts to stabilize in concrete.
Ensure the subbase extends beyond the framing perimeter to support overhangs and prevent sinking.
Assembling the Frame
Using your plans and measurements, cut lumber to size. Mark and create cutouts for appliances ahead of assembly.
Follow your design’s layout when fastening the framing members together. Keep everything square and reinforce with triangles.
Cut appliance access holes according to manufacturer specs so you can drop in grills, fridges, etc. Attach ledger boards around cutouts for support.
Add weather stripping, trim pieces, or other decorative elements once framing is complete.
Doing a dry run with appliances ensures proper fit before adding countertops and cabinetry.
Adding Cabinetry, Countertops & Appliances
The frame structure is now ready for the components that transform it into a fully-equipped outdoor kitchen.
Cabinetry
Sturdy cabinetry tailored to the frame provides storage and gives the space a furnished look.
Waterproof outdoor cabinets are available in wood, laminate, welded metal, and other materials to suit different budgets.
Choose cabinet door styles that match your design aesthetic. Go for integrated handles or add hardware.
Maximize storage potential with a mix of upper and lower cabinets, plus drawers, pull-out shelves, and other smart organizers.
Countertops
Countertops should be durable, non-porous for food prep, and waterproof. Popular options are granite, quartz, marble, and porcelain.
Cut countertops to fit the frame, allowing space for appliances. Undermount sinks and grill/fridge cutouts can be pre-cut.
Consider edge profiles like standard square, beveled, or modern waterfall that extends to the floor.
Appliances
Time to add the outdoor kitchen appliances that make cooking alfresco possible.
Choose a powerful gas grill with enough BTUs for fast heating and plenty of cooking surface.
Undercounter refrigerators are designed for outdoor use and keep food chilled.
To complement grilling, include a side burner, pizza oven, or other small appliance options.
Ensure proper ventilation and gas lines are in place for ranges and other fuel-burning appliances.
A prep sink for washing produce helps make outdoor cooking more convenient.
Match appliance sizes to pre-cut frame openings and manufacturer requirements.
Decorating Your Outdoor Kitchen
With the heavy lifting complete, the fun part is adding decorative touches to make the space inviting. Enhance both form and function with these ideas:
Ambient lighting like pendant lights over counters or string lights above creates a magical ambiance for evening gatherings.
Include comfortable barstools for seating at the counter or a bistro table and chairs.
Incorporate green accents with potted herbs, flowers, and other easy-care greenery.
Screen walls, curtains, or strategically placed plants add privacy to busy areas.
Weatherproof woven or coconut fiber rugs soften hard flooring and tie the whole area together.
The frame structure itself can have decorative woodwork, built-in benches, coverings like vines or canopies, and more.
Building your own outdoor kitchen frame allows you to customize every detail while also saving money compared to buying a pre-made unit. While it requires considerable planning and elbow grease, the end result of a functional, eye-catching outdoor cooking space is well worth the effort. The steps outlined here break down the process into manageable pieces. Start by determining your needs to shape the design, then focus on sturdy framing as your foundation. Finish by infusing style with cabinetry, surface materials, and decor. With the right preparation and our tips in mind, you can create the outdoor oasis of your dreams.
Using reclaimed materials like weathered barn wood or salvaged pipes and fittings gives your outdoor kitchen frame rustic appeal while reducing waste. visit salvage yards to discover unique materials full of character. Just ensure any reclaimed wood has been properly cured and treated. Building a pergola or shade structure above your outdoor kitchen frame helps make the space more comfortable during sunny and rainy weather. The shelter provided lets you enjoy cooking outdoors regardless of conditions. Construct a basic wooden pergola, or install a retractable awning for adjustable coverage. Integrating built-in seating like benches directly into the sides of the frame is a space-saving trick. Opt for durable, weather-resistant materials that complement your design. Added seating gives guests a place to relax and makes the area more welcoming.
