Adding a rolling kitchen island is one of the best ways to maximize unused space in your cooking area. A movable island provides much-needed countertop real estate for food prep and serving while also offering storage solutions. With the right plans, materials, and tools, you can build a custom island tailored to your kitchen’s layout and needs.
A rolling island is perfect for small or awkward kitchens. Since it’s on casters, it can be moved around as needed for access to sinks, stoves, and refrigerators. When not in use, simply roll it out of the way against a wall or into a corner. Let’s look at how to determine your needs, choose materials, find plans, and construct a rolling cart or island to enhance your cooking experience.
Determine Your Needs
Before building your rolling island, assess your current kitchen setup. Look at the available floor space and how you utilize your existing counters and cabinets. This will help you decide on the right size, features, and purpose of your movable island.
Assess Your Layout and Space
Take measurements of your kitchen area to find the ideal spot for placing a rolling cart or island. Make sure there is adequate room to move and open appliances when the island is in use. Standard kitchen guidelines recommend at least 42 inches between counters and islands. Also consider traffic flow from cooking areas to sinks and refrigerators so the island doesn’t create a bottleneck.
If your kitchen is quite small, opt for a narrower island around 30-36 inches wide. For larger kitchens, you can build an island up to 48 inches wide to take full advantage of the space. Just don’t oversize it–you still need room to conveniently move around it.
Decide on Island Purpose and Features
How will you utilize your new rolling island? Typical uses include:
- Extra food prep area and serving space
- Storage for kitchen tools, bakeware, and pantry items
- Casual dining with seating for a couple of stools
Consider which features will be most useful like drawers, shelves, towel racks, spice storage, or even a wine rack. Building a rolling island with customized elements to suit your needs and style will maximize its functionality.
Estimate the Size You Need
Standard kitchen island dimensions are usually around 36-42 inches tall, 36-48 inches wide, and 16-18 inches deep. However, you can adjust these measurements as needed to fit your particular space.
A good rule of thumb is to allow at least 24 inches of depth for ample food prep room. The countertop height should match your existing counter height for ergonomics. Take measurements of your current countertop to determine the ideal island height.
Be sure to measure the amount of floor space you have available for the island’s footprint. Mark the floor with tape to visualize the size and location. Having the actual dimensions will help modify plans to build the perfect custom island.
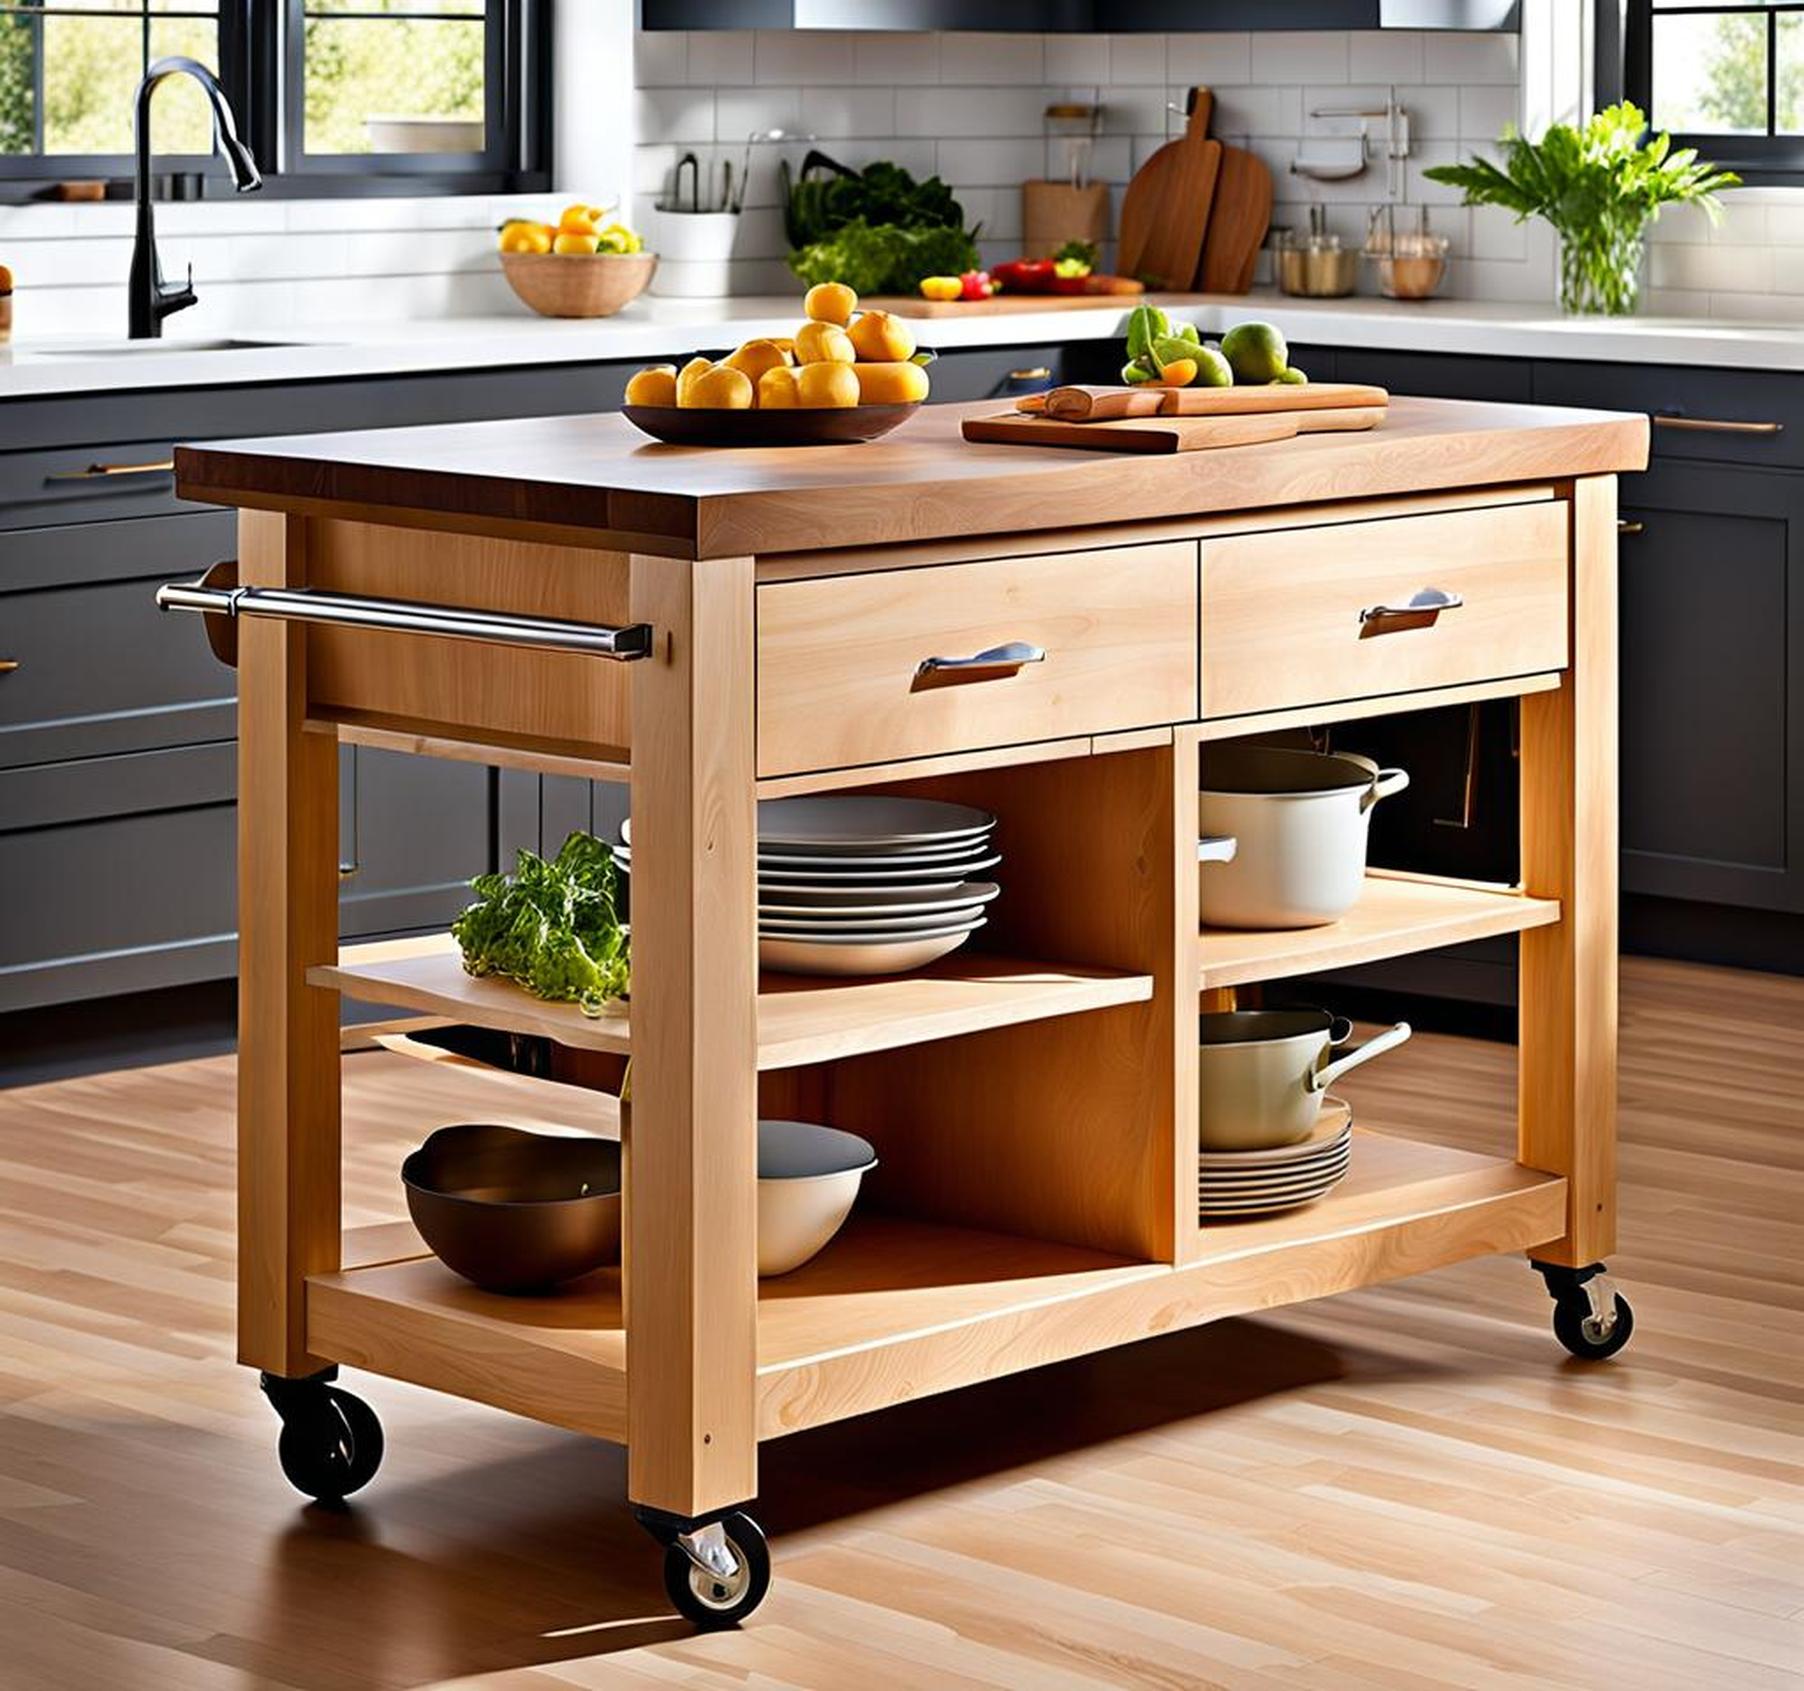
Select the Best Materials
Choosing the right materials for your rolling island will ensure it looks great, holds up to heavy use, and matches your kitchen decor. Consider your budget, skills, and the island features you desire when picking materials for the frame, countertop, and more.
Hardwoods for Beauty and Durability
Hardwoods like oak, maple, cherry, or walnut make an attractive and sturdy base for a rolling kitchen island. While pricier than other options, hardwoods add natural beauty that can be enhanced with stain colors. They are also extremely durable and resistant to heavy use and moisture.
Hardwood boards are easy for beginners to cut, join, and fasten using basic tools and techniques like pocket screws. With proper assembly and finishing, a hardwood island will last for decades.
Plywood for Affordability
For a more budget-friendly option, construct the base from plywood. Plywood offers similar strength to solid wood but is cheaper and easier to work with. Use at least 3/4-inch thick plywood for a rigid, flat base that won’t warp over time.
Plywood sheets make constructing the sides, face frame, and base a breeze. Just cut pieces to size with a circular saw or table saw, join with wood glue and screws, and assemble. Add trim pieces or moulding to dress it up.
Butcher Block Countertops
Butcher block is ideal for rolling kitchen island countertops. Made from hardwood planks fused together, it provides a durable, knife-friendly surface for food prep. Butcher block comes premade in various sizes and can be cut down to fit your island.
Oil or seal butcher block regularly to prevent stains and damage from moisture. It addswarmth and can coordinate with most kitchen styles from modern to farmhouse.
Casters for Mobility
A set of quality casters is key to making your island smoothly roll wherever needed. Look for casters at least 3 inches in diameter for easy mobility. Larger casters roll over uneven floors and thresholds with less effort.
Locking casters provide control and keep the island securely in place while in use. Choose soft rubber wheels for hardwood or stone flooring to avoid scratching. Install casters to evenly distribute the island’s weight.
Gather Essential Tools
Building a rolling kitchen island is an intermediate woodworking project that can be tackled with basic tools. Here are some essentials to have on hand for constructing and finishing your island:
- Saw – A table saw helps cut panels and lumber accurately. A circular saw or jigsaw can also be used.
- Drill – A cordless drill/driver will be used constantly for driving screws to assemble the base.
- Sander – Useful for smoothing wood between steps and removing marks.
- Measuring tools – A tape measure, square, and ruler are necessities for precise cuts.
- Clamps – Help hold pieces flush and tight for gluing and driving screws.
- Safety equipment – Goggles, hearing protection, and a dust mask are essential safety gear.
Additionally, you may need a hammer, utility knife, screwdrivers, wood glue, nails, screws, sandpaper, and wood finish supplies like stain, sealant, or paint and brushes.
Review Sample Plans and Designs
One of the best resources for building a rolling kitchen island is to review DIY plans online. There are many free plans available through woodworking, home improvement, and tutorial websites.
Find Detailed Blueprints and Instructions
Search for “rolling kitchen island plans” to find step-by-step instructions and blueprints. Many plans include:
- Cutting layouts and measurements for all components
- Joinery techniques and hardware recommendations
- Tips for modifying size or features
- Finishing and assembly guidance
- Shopping lists of required tools and materials
Look through several plans to find one with the features and style you desire. Simple rectangular islands are easiest, but you can also find plans for islands with complex cabinetry, drawers, and built-in accessories.
Consider Customization Options
Many sample plans provide inspiration for customizing a basic rolling cart to suit your needs. Some ideas include:
- Built-in drawers for storing kitchen tools
- Cabinets with doors for hidden storage
- Spice racks, towel bars, and shelves
- Wine glass racks or stemware storage
- A rollout trash or recycling bin
- Adding an overhang on one side for seating space
- Personal touches like paint, molding, or hardware
Browse photos of completed islands online or in home decor magazines for additional customization inspiration. Sketch your own plans to map out a completely unique island perfect for your cooking and entertaining needs.
Build the Rolling Base
A sturdy base with rolling casters is the foundation of your movable island. Follow these steps to construct the base before adding the countertop:
Cut Pieces for Sides, Frame, and Bottom
Start by cutting plywood or lumber pieces for the sides, front and back frame, and the bottom sheet or boards per your plans. A table saw ensures straight, smooth cuts. Remember to measure twice and cut once! Having all materials pre-cut makes assembly much easier.
Attach Casters to the Base
Mount locking casters to the four corners of the bottom piece using bolts or screws. Make sure casters are recessed from the edges so they don’t stick out past the sides. Positioning casters slightly inset increases stability.
Assemble the Frame and Attach Sides
Fasten the front and back frame pieces to the side panels using wood glue and screws to create the open base frame. Then fit and attach the plywood bottom sheet or boards and check for square.
Add Support Braces
It’s wise to include additional corner braces, blocks, or battens to reinforce the base frame. This prevents racking and sagging when heavy items are placed on the island top. Secure braces with glue and screws.
Add the Countertop
With a stable rolling base built, it’s time to attach the countertop. Most DIY plans advise using pre-made butcher block, but you can also construct a wood countertop using edge-glued boards.
Size and Cut the Countertop
Measure the outside dimensions of your completed base. Cut the countertop slightly oversized using a circular saw with a guide or a table saw. Leaving an extra 1/4-inch on each side allows for trimming a perfect fit.
Attach Countertop Securely
Set the countertop on the base and align the edges. Use wood glue and screws driven from underneath to firmly secure it place. Avoid overhanging the countertop too much past the base sides for stability.
Sand Edges and Finish
Once attached, use a sander to round and smooth the front edges and corners. Finish as desired with food-safe oil, wax, or sealer to protect the butcher block or wood surface.
Include Storage and Features
Adding functional elements like storage and seating to your rolling island is straightforward. Get creative with ways to customize your island to your cooking and entertaining style.
Attach Cabinets, Drawers, Shelves
Using your plans, cut and secure cabinets, drawers boxes, and shelves to the base frame or sides. Make storage features deeper than the 18-inch countertop overhang for capacity. Add knobs, pulls, or handles to dress them up.
Consider Additional Accessories
Don’t stop at just cabinets and shelves! You can attach a myriad of helpful accessories like:
- Wine glass racks
- Towel bars
- Spice racks
- Cutlery dividers
- Hooks for cooking utensils
- Trash or recycling bins
- Baskets for storage
Matching the finish and hardware on accessories to your kitchen’s existing style creates a cohesive look. Power drills make installing additional elements easy.
Include Seating Space
For casual dining or party prep, extend the countertop on one side to allow space for seating. An overhang of 12-15 inches can accommodate two stools or chairs tucked underneath when not needed.
Finish the overhang edge attractively as this area may see heavier use. Adding cushions to stools makes seating more comfortable.
Finish and Protect the Island
Applying protective finishes makes your DIY kitchen island more durable and stylish. Follow these tips for an ideal final finish:
Thoroughly Sand Before Finishing
Use 180 to 220 grit sandpaper to sand all surfaces smooth. Round over any sharp edges or corners slightly. Remove any scratches, glue marks, or other imperfections for the best results.
Apply Protective Finish
Seal the wood with polyurethane or oil-based varnish to protect from moisture, stains, and daily wear-and-tear. Multiple thin coats provide better protection than one thick coat. Lightly sand between coats.
Add Decorative Details
Consider finishing the base and legs differently than the countertop for contrast. Paint or stain the base and use oil on the butcher block for a striking two-tone look.
Add trim accents, molding, or hardware to complement your kitchen style. Changing knobs and pulls can give a brand new look over time.
Position Island in Your Kitchen
You did it! With your custom rolling island built, it’s time to put it to use improving your cooking experience.
Review Safety Tips
Before rolling your island into place, check:
- Casters are secure and roll smoothly
- There are no sharp corners or edges
- Any accessories or items on open shelves won’t fall off when moving
- Electrical cords won’t snag or get trapped
Go slow at first and make small adjustments to position the island perfectly.
Stock with Supplies
Now fill your new storage space and top area! Suggested items include:
- Cutting boards, kitchen tools
- Appliances like mixers, instant pots
- Baking sheets, pans, and casserole dishes
- Spices, oils, condiments for cooking
- Tableware, serving pieces
Group items logically for efficiency. Frequently used tools and appliances can stay out, while others live in cabinets or drawers.
Finish your rolling island by decorating it to match your kitchen’s look. Some fun ways to style it include:
- Hanging utensil racks or pots
- Fresh flowers or herb garden
- Vintage or decorative tins for storage
- Pretty contact paper inside drawers
- Baskets, crocks, containers
A custom rolling island opens up a world of possibilities for your cooking area. Build your ideal island and start experiencing the benefits of extra workspace and storage!
