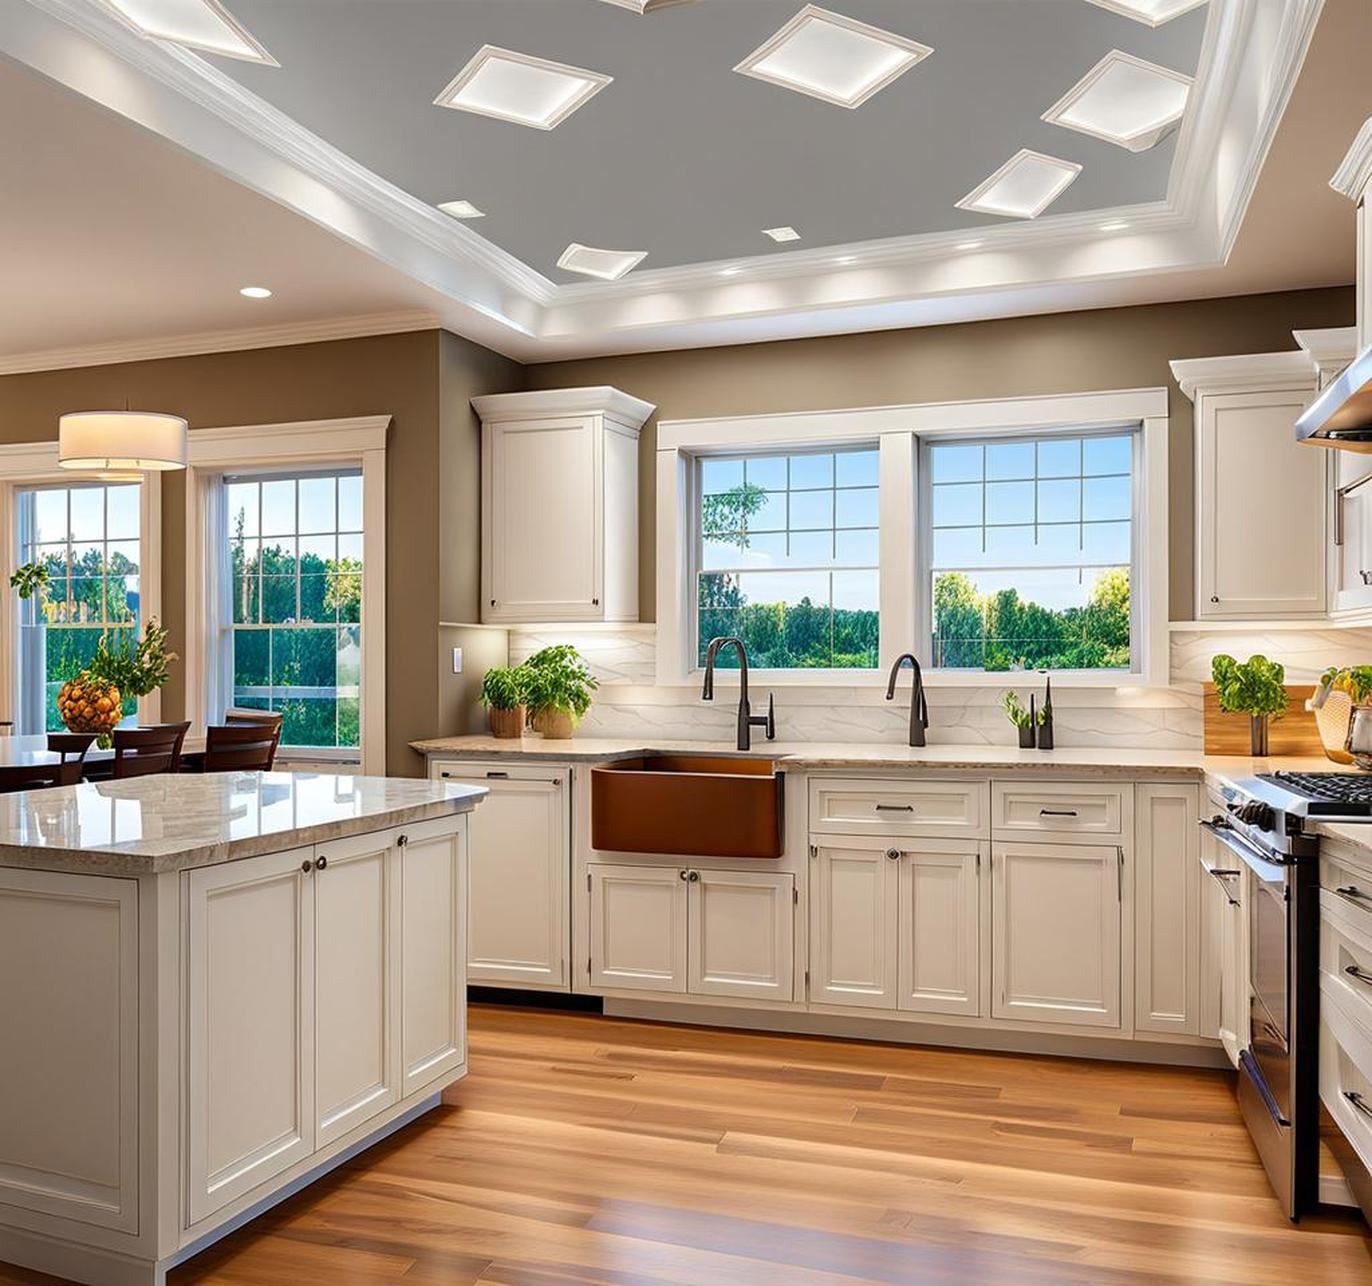
Upgrading your kitchen’s lighting can make a dramatic difference in the overall ambiance and functionality of the space. Outdated fluorescents and yellowed incandescents don’t do your beautiful kitchen design any favors. LED ceiling panels present an easy upgrade that can transform the look and illumination of your culinary workspace.
LED ceiling panels are slim, flat light fixtures that mount directly to the ceiling surface. They provide bright, uniform light across their entire surface area, bathing your countertops and work zones in clear, shadow-free lighting. LEDs consume very little electricity too, saving you money compared to antiquated lighting.
Installing LED ceiling panels is a DIY-friendly project for most homeowners. With some simple tools, a bit of wiring know-how, and the ability to cut a ceiling hole, you can upgrade your kitchen lighting on a weekend. Let’s take a look at what’s involved so you can learn how to easily install LED panels in your kitchen.
What are LED Ceiling Panels?
LED ceiling panels, sometimes called LED flat panels or LED troffers, are slim rectangular light fixtures designed to lay flush against the ceiling. They come in standard sizes like 2×2, 2×4, and 1×4 feet to conveniently fit typical suspended ceiling grids.
Inside the panel, hundreds of tiny LEDs provide the illumination. The LEDs are mounted to a circuit board which distributes power from the driver. The driver transforms incoming AC current to the low voltage DC required by the LED components. It also allows for dimming capability.
The LEDs, circuit boards, and driver are all contained within the panel housing which has a diffused acrylic or polycarbonate lens. This creates a uniform glow of light across the panel’s entire surface. Overall, LED panels are lightweight yet durable fixtures perfect for lighting large areas.
Benefits of Using LED Panels for Kitchen Lighting
Here are some of the top advantages of installing LED ceiling panels in your kitchen:
- Energy Efficient – LEDs require far less electricity than incandescent or fluorescent lights. This saves you money on utility bills.
- Long Lifespan – Quality LED panels will last up to 50,000 hours before needing replacement.
- Cost Savings – The energy savings and LED longevity lead to big cost savings over time.
- Sleek Aesthetic – The thin, streamlined look of LED panels adds modern style.
- Flexible Size – Panels come in various standard sizes to fit any kitchen layout.
You’ll also get bright, evenly dispersed light that illuminates countertops and work zones perfectly. The instant-on illumination provides safety and convenience unlike older fluorescent lights. Overall, LED represents the most advanced and efficient lighting option for contemporary kitchens.
Important Considerations When Choosing LED Panels
To select the ideal LED panels for your kitchen, keep these key factors in mind:
Lumens and Brightness
Consider the lumen output that’s right for your space. Kitchens typically need fairly high lumen levels like 3000-5000 lumens for adequate light. Measure your kitchen size and look for panels that will provide sufficient brightness.
Color Temperature
LEDs come in different color temperatures, from warm white to daylight. Look for a color temperature around 3000-4000K which provides bright, neutral lighting perfect for kitchen tasks.
Dimmable Driver
If you want to control brightness, choose panels with dimmable LED drivers. This allows you to dim the lights when desired.
Size
Standard sizes like 2×4 ft or 2×2 ft allow for simple retrofitting into existing ceiling grids. Measure your space carefully though to ensure a perfect fit.
Flat Panel Design
Panels should have a completely flat and thin design. Curved or angled panels won’t properly fit a ceiling application. Look for panels less than 3 inches thick advertised for ceiling mounting.
LED vs Fluorescent Kitchen Light Comparison
Let’s compare LED panels to traditional fluorescent kitchen lighting so you understand the differences:
Lifespan
LEDs can last up to 50,000 hours while fluorescents typically last 10,000 – 20,000 hours before burning out.
Energy Efficiency
LEDs use about 40-60% less power than fluorescents to produce the same brightness.
Mercury Content
Fluorescents contain hazardous mercury while LEDs are 100% mercury-free.
Light Quality
LEDs provide better color accuracy and visual acuity than the buzzy, flickering light of fluorescents.
Customizability
LEDs offer more choices for color temperature, dimming, and controllability compared to basic fluorescent tubes.
While fluorescent lights have been the standard in kitchens for decades, LED panels represent a major upgrade in performance, efficiency, and quality.
Are LED Panels Easy to Install?
Installing LED ceiling panels is designed to be simple enough for the average homeowner. Here’s an overview of the process:
Wiring
Panels use low voltage DC power, so you simply wire them to the existing AC supply lines. No special electrical knowledge is required.
Mounting
LED panels affix directly to the ceiling surface. They come with mounting hardware for attaching to wood, drywall, or suspended ceilings.
Tools Needed
You’ll need basic tools like a screwdriver, wire strippers, ladder, and drywall saw or razor knife. No special electrical tools are necessary.
For a visual guide, watch this video showing a complete LED panel installation:
With minimal wiring, some screws, and a cut ceiling hole, the panels can be installed in just a few hours in most cases. The simplicity makes LED panels one of the easiest lighting upgrades you can make.
Step-by-Step LED Panel Installation Instructions
Map out where you want to place the panels for optimal light coverage. Mark the locations with tape or chalk.
2. Cut Power
Turn off power to the kitchen ceiling lights at the breaker box to ensure safe working conditions.
3. Measure and Cut Ceiling Hole
Measure and mark the ceiling cutout size needed for each panel. Cut the holes carefully with a drywall saw.
4. Run Wiring
Feed the LED driver wiring from the panels to the existing electrical junction box and make connections.
5. Mount Panels
Insert panels into ceiling holes and secure them using provided screws and brackets.
6. Check Alignment
Make sure all panels are fully flush to the ceiling with no gaps or visibility of the cut edges.
7. Connect Drivers
Plug the driver’s quick connector cable into the panel and test that it powers on correctly.
8. Install Dimming
If you have dimmable LEDs, connect dimmer switches or wiring at this point to enable brightness control.
9. Turn Power Back On
Restore power at the breaker box. Verify full operation of all panels and dimming functions if equipped.
10. Admire Your Work
Bask in the bright, energy-efficient glow of your new LED-lit kitchen!
The full installation should take 2-4 hours depending on the number of panels, familiarity with wiring, and complexity of your kitchen’s construction. Take your time to ensure proper placement and electrical connections. Also be cautious when cutting holes to avoid damaging roofing or utilities.
Cost Breakdown of LED Panel Installation
Here are typical costs associated with switching to LED ceiling panels:
LED Panel Cost
Expect to pay $50 – $150 per panel depending on wattage, size, and features. Dimming ability or smart technology may increase costs.
Labor Costs
Hiring an electrician usually costs $40-$100 per hour. However, you can install panels yourself in most cases.
Wiring and Tools
Any wiring, junction boxes, and basic tools will likely add $20 – $50 to the total project cost.
Total Project Cost
For a 10×10 kitchen with 4 LED panels, expect a total cost around $400-$800. This provides a dramatic lighting upgrade at reasonable expense.
ROI Timeline
Given the energy savings over old lighting, the project often pays for itself within 1-3 years through lower electricity costs.
Tips for Maximizing LED Panel Performance
To keep your new LED kitchen ceiling lights performing optimally for years to come, follow these maintenance tips:
- Use microfiber cloths to gently clean panels and prevent dust buildup.
- Avoid exposing panels to moisture which can damage LEDs and wiring.
- Don’t apply any chemicals or cleaners directly to panels.
- Check that panels are not loose or sagging over time.
- Follow the manufacturer’s suggested replacement schedule for LEDs.
With occasional cleaning and adherence to the product guidelines, quality LED panels will provide up to a decade of trouble-free illumination in your kitchen.
Frequently Asked Questions About LED Panels
Here are answers to some common questions people have about installing LED ceiling panels:
How much light do LED panels provide?
Panels are available in a wide range of lumen outputs, typically 1500-6000 lumens. Choose brightness appropriate for your kitchen size and tasks.
Do LED panels have a long lifespan?
Properly installed LED panels will last up to 50,000 hours. This is 2-5 times longer than fluorescent lighting.
Are LED panels expensive to buy and install?
LED panel prices have dropped steadily. Expect $100 – $200 per panel installed. Energy savings often pay back costs within 1-3 years.
Can LED panels get wet or be used outdoors?
LED panels are designed for indoor, dry locations only. Exposure to water or humidity can damage panels.
Do LED panels need special wiring or electrical work?
LED panels use low voltage DC power. No special wiring is needed in most cases. Connecting to existing AC supply lines is simple.
Can LED panels be dimmed?
Many LED panels come with dimmable drivers. Simply connect an LED-compatible dimmer switch to enable brightness adjustment.
Hopefully this FAQ helps resolve any concerns you might have about installing LED panels. They are an easy yet transformative lighting upgrade for your kitchen.
Upgrading your kitchen lighting to LED ceiling panels is one of the best investments you can make. The thin, energy-efficient panels provide exceptional illumination for food preparation tasks. Their simple installation, long lifespan, and instant-on convenience also make LED panels the premier choice.
Carefully measure your kitchen and select panels with appropriate lumen output and color temperature. Look for dimmable drivers if you want lighting control. Installation involves basic wiring and ceiling cuts – easy enough for DIY completion in most homes. Within just a few hours, you can bask in the crisp glow of your new LED-lit kitchen.
Made for longevity and efficiency, LED ceiling panels will serve your family’s needs flawlessly for years. Give your kitchen the bright, modern makeover it deserves and learn how quick and easy it is to install these thin LED lights.
