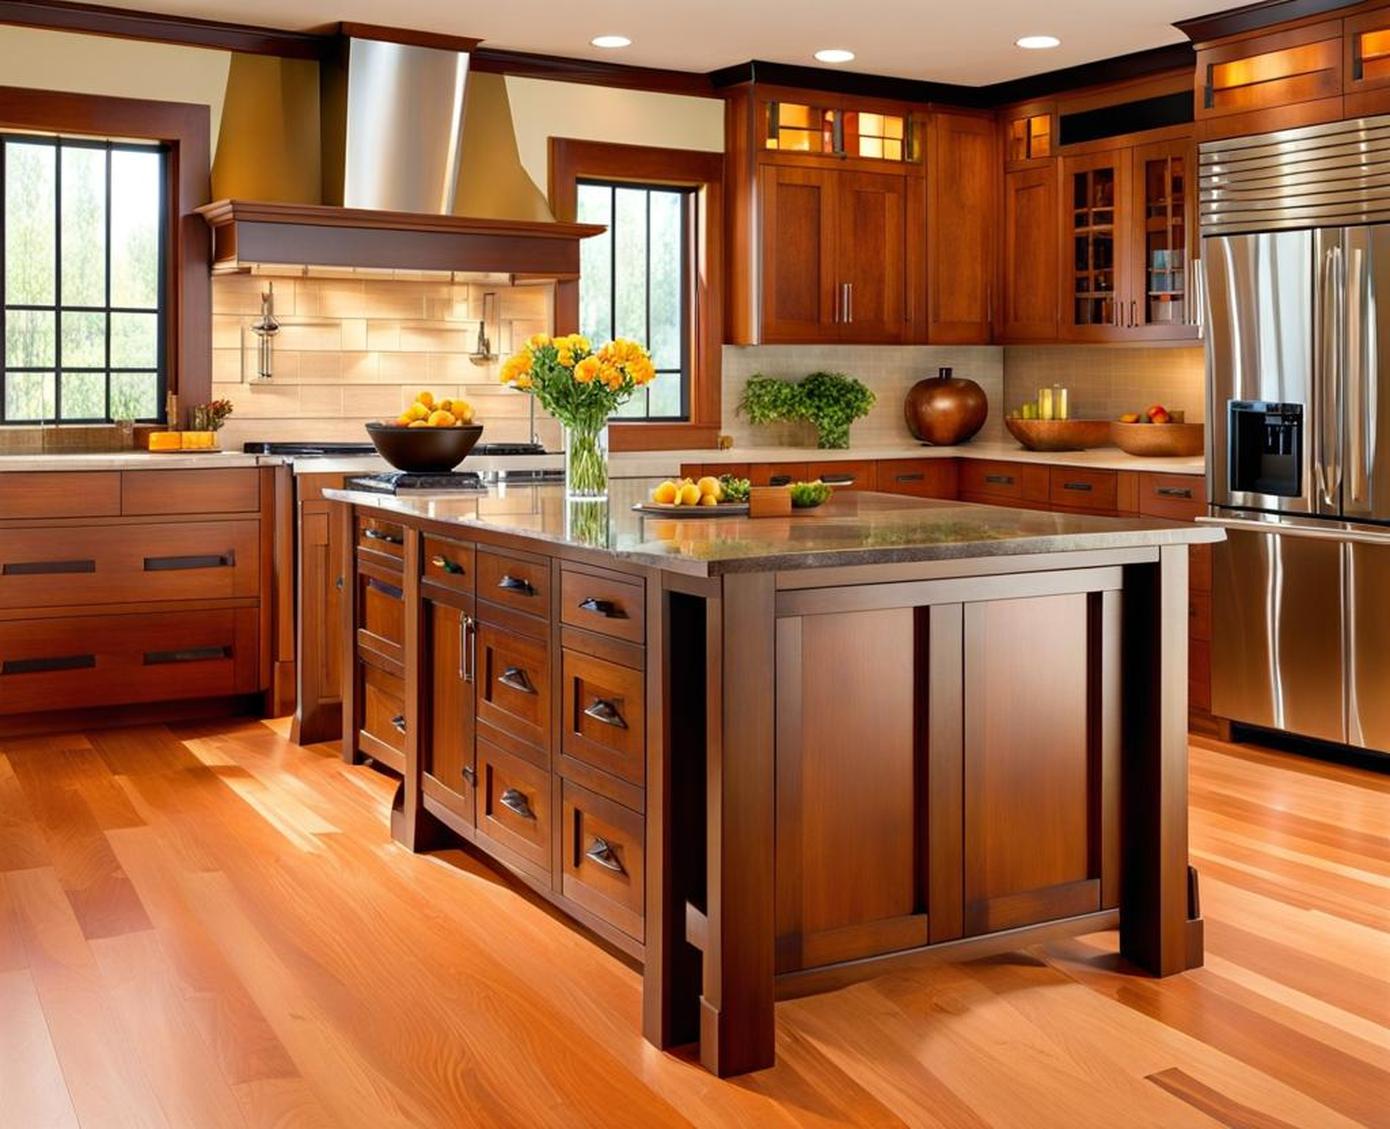
A kitchen island can transform the look, functionality, and flow of your cooking space. By incorporating one designed in quintessential Craftsman style, you add storage, surfaces, and seating while infusing warmth and character into the room.
Craftsman decor celebrates natural materials, quality craftsmanship, and simplicity in form. This arts and crafts approach gained favor in the early 1900s as a rebellion against mass production. Today, the hallmarks of Craftsman style continue resonating in kitchen islands made from authentic woods, hand-worked details, and organic shapes.
Overview of the Craftsman Style and Its Defining Traits
The American Craftsman style championed handmade furniture and architectural details over the post-Industrial Revolution proliferation of standardized, manufactured goods. Woodworkers returned to traditional joinery and finishing methods, favoring natural imperfections that gave each piece a unique personality.
In a Craftsman kitchen, you may notice:
- Exposed joinery using through mortise and tenon joints or pegged butt joints
- Visible trim outlines defining cabinets, drawers, and built-ins
- Integrated cabinets, hutches, and seating nooks
- Hardware pulls and accents in copper, bronze or iron
When translated into a kitchen island, these Craftsman elements create a welcoming, almost rustic focal point. The island introduces greenery and pops of metal to balance out neutral cabinetry. Grouping chairs or stools around it fosters connection during meal prep and casual dining.
Characteristics like Natural Materials, Visible Joinery, Built-Ins, and Metal Accents
Craftsman spaces value natural materials for their inherent warmth and texture. Wood surfaces invite you to touch them, appreciating years of growth rings. Diffused light glows beautifully across the depth and grain variations.
Traditional oak or hickory lend familiar substance underfoot and at the countertops. More unique alternatives like reclaimed barnwood or redwood burl better showcase the wood’s natural story from forest to furniture.
The island base showcases precise joinery fitted together without pretense of mechanical fasteners. The legs meet the side rails in sturdy mortise and tenon joinery, often secured by a visible wooden peg. Drawers stack neatly on full-extension glides that allow access to every corner within those deep boxes.
Wrought iron offers equal parts strength and artistry in wrapped corners and sweeping curves across legs and corbels. Hammered copper or oil-rubbed bronze nod to gas lamps and sconces from an earlier era of pre-electrified homes. Their dim, flickering glow created islands around fireplaces and kitchen hearths – hubs for gathering before the workday’s end.
Examples of the Style Translated into Kitchen Islands
Some quintessential Craftsman kitchen islands celebrate natural wood elements through reclaimed floors for the base cabinets or a butcher block countertop. Others incorporate hand-forged metalwork along the trim. Here are a few standout examples:
Mission Style – Features straight, nearly flush front surfaces accented by exposed joinery and trim boards. Thick countertop edges reinforce the structural integrity. Iron hardware anchors timber bases finished in gel stains.
Arts & Crafts – Flaunts mixed wood types, textures and finishes playing against each other. Light and dark stains mingle within geometric cabinet fronts. Carved corbels atop a brick columned base contrast the smooth quartz surface. Forged brackets reinforce the overhang.
Bungalow – Checks all the boxes with sweeping eaves, knee braces reinforcing the open shelves and an eclectic combination of materials. Stacked stone supports wooden cabinets while concrete evokes miles of weathering across the expansive countertop.
Finding the Right Spot for Your Island
Placement directly impacts how easily your Craftsman kitchen island fits into your lifestyle. Consider existing traffic flow between regularly used appliances and doorways. An island stretched perpendicular to your counters and cabinets acts as a natural room divider while allowing access from either side.
Take measurements to find a good fit based on your floorplan and available pathways around it. Islands spanning 4-6 feet accommodate most cooking and seating needs without overwhelming. Just ensure enough space remains for walking between the island and existing kitchen elements.
Layout Considerations Like Traffic Flow and Room Dimensions
A common guideline suggests leaving at least 48 inches of clearance if the island will see heavy traffic flows. This suits multiple family members circulating through at once. But in small or single-cook kitchens, 36 inches still allows comfortable movement. Just account for any seating that may push back and impact the surrounding area.
Consider existing sunlight patterns and views outside windows when positioning it. Islands along exterior walls often have an overhead hanging lamp centered precisely along that span. The light conveniently illuminates food prep surfaces without competing with window placements.
Allow Space for Seating or Walkways Around the Island
Arranging stools along one side or choosing a layout with seating on two adjacent sides allows diners and cooks to face each other. Great for conversation across the beautiful live-edge oak countertop now separating you.
Opting against seating also remains a valid choice. The extra surface area cleared of visual clutter keeps that crisp, airy Craftsman vibe. Just be sure to allow at least 36 inches of clearance all the way around any portion extending out from the cabinets or walls.
Near a Window for Natural Light or to Frame a View
Aligning the narrow end of your island with a row of windows or sliding glass doors directly plays into the Craftsman affinity for nature. It frames a view outdoors, almost making that lush landscape the kitchen’s focal point.
A skylight overhead has similar effect, with sunlight streaming down to illuminate food prep. Locally sourced stone or wood across the countertop almost glow in this bright yet diffused daylight. Hand-rubbed finishes and veining in the surface gain new dimension as angled light dances across them.
Selecting Materials That Align with Craftsman Design
Traditional Craftsman homes use materials found readily available in nature. Modern interpretations lean into stones like granite and polished concrete that evoke ideas of permanence and timelessness. We’ll explore finish options that help your island feel comforting and familiar.
Wood Types Like Oak or Hickory for the Base Cabinets
Oak offers one of the most readily available and versatile wood options. Red oak with its open grain looks stunning with a dark walnut stain across traditional shaker style doors. White oak has a tighter grain well suited to painted finishes in sage green or sky blue.
Hickory blends the best elements of oak and maple – hardness and strength yet accommodating to stain or paint. Fuming techniques introduce ammonia to react with the tannins and create dynamic black streaking across golden brown hickory.
Granite, Butcher Block, or Concrete for the Countertop
Granite countertops practically define luxury kitchens thanks to their resilience and natural beauty. Whites, grays, blacks and warmer beiges suit Craftsman environments through either solid surface slabs or unique aggregate compositions.
Butcher block offers a more rustic take with visible wood grains and inherent moisture resistance. Oiled finish allows you to see and feel the yellow birch or edge grain acacia’s warmth. Use a protective pad when cutting to preserve the wood over decades.
Concrete delivers industrial edge through mottled, variegated surfaces and embedded aggregate. Mix in crushed stone, hematite, or glass for organic variation. Concrete stains introduce personalized colors – not just gray but lush green or coastal blue.
Metal Finishes That Add Old-World Appeal
The island itself looms as the kitchen’s focal point, but metalwork accents make it a true showstopper. Hand-forged braces, corbels and wraps celebrate skilled artistry. Finishes build character and depth.
Oil-rubbed bronze finishes use a controlled oxidation to accelerate and mimic a lifetime of handling. Continual polishing over time ensures vintage goods like pulls, knobs and hooks gain this timeless patina.
Alternatively, living finishes like brass and copper intentionally age from contact with air and moisture. As they develop a stately, dignified patina of verdigris, the metals take on more personality. We say embrace the tarnish and the memories it represents.
Customizing Storage Solutions
One advantage to opting for custom construction lies in the virtually endless options for storage. Designinterior fittings based around your family’s needs and cooking styles. Gear lovers may crave specialty racks and compartments while minimalists seek cleverly concealed solutions.
Drawer Configurations to Handle Cooking Tools
Full extension side mount glides mean you easily pull storage all the way out rather needing to lean inside. Consider graduated heights to consolidate like items convenient to their use.
Deep lower drawers accommodate bulky stand mixers, food processors and blender bases. Middle heights stow hand tools, graters, tenderizers within easy reach. Shallow upper drawers organizer spices or foil rolls laid flat.
Pull-Out Shelves for Stand Mixers and Appliances
Pantry pull outs allow storage of oversized mixers, plus their bowls and attachments all together along the base cabinet’s full depth. Roll-out trays also secure microwave ovens or stand blenders when not in use to regain counterspace.
Some designers install modular storage with interchangeable dividers. Relocate partitions as needed when switching between small appliances or alternate kitchen tools occupying that coveted space.
Baskets for Fruits and Vegetables
Woven baskets evoke marketplace stands filled to overflowing with fresh produce. Metal or wood framed holders mount to cabinet faces or slide sideways from base units. Open construction airs out onions, shallots or potatoes to prevent spoilage while on display.
Deep farmer’s sinks fail to contain unruly heads of leafy greens or celery bunches. Let bushel baskets corral wayward veggies until their turn meeting the chef’s knife strikes.
Incorporating Seating for Casual Dining
Kitchens naturally foster interaction and intimacy even among relative strangers. Meals cooked alongside friends or families seal bonds through shared stories swapped over prep and cooking. Your Craftsman kitchen island provides that communal spot centered within the culinary action.
Freestanding Stools That Slide Neatly Underneath
Clearance below the overhang limits leg room, so opt for backless stools around 25 inches tall. These slim profiles tuck discretely under the island when pulled flush.
Stools stacking two or three high maximizeunused cubic footage within that void. Just ensure weight capacities accommodate your family and visiting crowds.
Bench Seating Built Right Into One Side
A bench base cabinet anchors one side, fostering casual gatherings around the reclaimed edge grain walnut countertop. This layout allows groups up to six to cluster comfortably elbow to elbow during meal prep.
Underneath, multiple drawers organize kitchen toolsnormally scattered across prime counterspace. Now corralled conveniently within arm’s reach of their prep zone.
The bench seating also suits booster chairs secured for counter-height dining once meals hit the table. Kids participate in cooking activities alongside parents before pulling up for family dinner.
Backless Chairs to Preserve the Open Feel
Barstools surrounding the island threaten compressing floor space visually. Backless saddle chairs or space saving counter height stools maintain airflow and sightlines.
Woven wicker, steel or wood spindle backs allow glimpses through available negative space while still providing back support. Arms braces help ease onto the chair but avoid limiting sideways access.
Designing a Functional Workspace
That generous slab of oak, granite or poured concrete begs getting put to work. Ensure adequate square footage for food prep and cooking across the island’s surface. Undermount sinks and commercial-grade faucets transform the space into a secondary cleanup zone.
Adequate Surface Area for Meal Prep Tasks
Standing comfortably while preparing multiple dishes means allowing at least 25-30 inches depth from front to back. This suits setting down a cutting board plus gathering ingredientslike vegetables, seasonings and oils.
Allow an additional 8 inches outboard prep area if planning to install sinks or cooktops. This prevents splashing onto diners while still keeping cooks elbow to elbow.
Optional Accessories Like a Cutting Board or Utensil Crock
Integrate a handy cutting board right into the countertop using a router or CNC carving machine. This custom inset installs flush when not in use but gives you a designated preparation zone.
Undermount utensil crocks built into the island edge or a custom knife block mounted nearby keep essential tools always on hand without cluttering workspace.
Undermount Sinks and Commercial Faucets
An apron front sink drops fully beneath the countertop, with only its functional basin revealed to users. This alignment highlights unbroken slabs beautiful stone or wood rather than a utilitarian eyesore.
Commercial style faucets feature articulating designs that expand reach while high-flow rates quickly fill stockpots. Lever handles activate the water with an elbow nudge, keeping potentially messy hands clear.
Achieving the Craftsman Look with Clever Details
Beyond major structural elements, thedcrafty flourishes transform functional islands into standout focal points. Elevated edgesand mixed finish details add interest while still celebrating naturalimperfections.
Thick Countertop Edges and Visible Joinery
A squared countertop overhang with thickness exceeding 1.5 inches gives the impression of structural stone slabsor timber milling. These sturdy edges reinforce perceptions of timeless durability with their mass.
Strategically placed through tenons stand proud rather than trimmed back flush. The visible joinery showcases precise execution echoing traditional woodcrafting methods.
Ornate Copper or Bronze Hardware Pulls
Hand hammered bars or scrolling filigree inserts contrast more primalmaterials like wood or stone. Positioning two pulls together on oversized drawers or doors enhances proportional balance while creating delightful shadow lines.
Allow the patina finish to evolve naturally overtime. Regular polishing concentrates age acceleration within handle crannies to emphasizethe depth and dimension in those details.
Handcarved Decorative Accents on the Legs or Trim
Flowing ribbon details swirl gracefully down the tapered legs, almostappear to flutter as you walk past. Fanciful faces — human, animal ormythical –hide playfully within the carved corbels supporting theoverhanging countertop.
Freeform wood edge details along the bar overhang invite tracing your fingers along the contours. Custom details like these link the present island with future generations yet to gather around it.
Instructions for Assembling Your Island
Prefinished modular components streamline islandconstruction down to joinery assembly and hooking up any electrical orplumbing systems. But for the ambitious DIYer, crating your dream island from raw lumber and slabs proves wildly rewarding.
Reviewing Provided Schematics and Parts Lists
Dimensional drawings detail each component and call out exactmeasurement points for joinery. This precision ensures uniformity acrosslike components cut from multiple planks.
Collated parts lists confirm quantities of legs, rails, drawer boxes needed to complete subassemblies. Catalog all elements before beginning to prevent shortages down the line.
Necessary Tools and Safety Precautions
Stock your toolkit with sharp chisels, a rasp, sanding blocks, and an array of clamps. Prepare your workspace to support 500+ pounds once the island comes together. Have helpers on hand for positioning the combined top and base.
Take precautions against breathing fine dust particles, eye injuries from flying debris. Ear protection dampens noisy electric sanders, while gloves reduce strain on your hands. Work deliberately but safely.
