Building a shed base on grass requires careful planning and execution to ensure stability and longevity. For small yards, selecting the right method to construct a sturdy foundation is crucial. We’ll delve into ground preparation, material selection, and installation processes to help you create a reliable shed foundation that withstands the test of time.
Understanding the Importance of a Proper Shed Base on Grass
A well-constructed shed base is the cornerstone of a durable and functional outdoor storage solution. When building on grass, the foundation becomes even more critical due to the inherent challenges of working with natural terrain. Let’s explore why a proper shed base is essential and the key considerations for constructing one on a grassy surface.
First and foremost, a solid shed foundation provides stability. It prevents your shed from sinking into the ground or shifting over time, which can lead to structural issues and damage to stored items. A level base also ensures that doors and windows operate smoothly, maintaining the shed’s functionality and appearance.
When it comes to building a shed base on grass, moisture management is paramount. Grass naturally retains water, which can seep into your shed’s foundation and cause rot, mold, or rust. A properly designed base creates a barrier between the ground and your shed, protecting it from moisture-related problems.
Another crucial aspect is load distribution. A well-built shed foundation evenly distributes the weight of the structure and its contents across the ground. This prevents localized stress points that could lead to settling or structural failure over time.
For small yards, choosing the right shed base construction method is particularly important. You’ll need to balance the need for a sturdy foundation with space constraints and aesthetic considerations. Options like concrete bases, while robust, may not be suitable for every small yard due to their permanence and impact on the landscape.
Opting for a grass shed base doesn’t mean compromising on quality or durability. With the right approach, you can create a foundation that blends seamlessly with your lawn while providing the necessary support for your shed. This might involve using materials like gravel, pavers, or even specially designed plastic shed base kits that allow grass to grow through them.
By investing time and effort in creating a proper shed base, you’re setting the stage for a long-lasting, reliable storage solution. It’s an upfront investment that pays off by preventing costly repairs and maintenance issues down the line. As we move forward, we’ll explore the steps and methods to achieve this crucial foundation for your backyard shed project.
Preparing the Ground for Your Shed Foundation
Before you start building your shed base, proper ground preparation is essential. This crucial step ensures that your foundation is stable, level, and capable of supporting the weight of your shed. Let’s walk through the process of preparing the ground for your grass shed foundation.
Begin by marking out the area where your shed will stand. Use stakes and string to outline the perimeter, making sure it’s slightly larger than your shed’s footprint. This extra space allows for easier construction and ensures that the base extends beyond the shed walls for added stability.
Next, assess the terrain. Look for any slopes or uneven areas that need to be addressed. Your goal is to create a level surface, so you may need to do some excavation or filling. If you’re working with a significant slope, consider terracing the area or building a raised foundation to compensate.
Remove the top layer of grass and soil within your marked area. Dig down about 4-6 inches, depending on the type of base you’re planning to install. This step is crucial for creating a solid foundation and preventing grass from growing through your shed base.
Once you’ve cleared the area, it’s time to tackle drainage. Poor drainage can lead to water pooling under your shed, causing damage over time. To improve drainage:
- Create a slight slope away from the center of the base area
- Consider installing a French drain if you’re in an area prone to heavy rainfall
- Add a layer of landscape fabric to prevent weed growth and improve water filtration
After addressing drainage, focus on compacting the soil. Use a plate compactor or hand tamper to create a firm, stable surface. This step is vital for preventing future settling and ensuring your shed base remains level.
If you’re opting for a gravel base, now’s the time to add your first layer. Spread a 2-3 inch layer of coarse gravel or crushed stone across the entire area. This base layer further improves drainage and provides a stable foundation for your shed.
For those choosing a concrete shed base, you’ll need to install formwork around the perimeter of your excavated area. Ensure it’s level and secure, as it will define the shape and height of your concrete slab.
Regardless of your chosen method, take the time to double-check that everything is level at this stage. Use a long spirit level or laser level to ensure there are no high or low spots that could cause problems later.
By thoroughly preparing the ground, you’re setting the stage for a successful shed base installation. This careful preparation will pay dividends in the longevity and stability of your shed, ensuring it remains a valuable addition to your small yard for years to come.
Exploring Suitable Methods for Building a Shed Base on Grass
When it comes to building a shed base on grass, several methods can provide a stable foundation while working with the natural landscape of your small yard. Let’s explore some of the most suitable options for creating a durable shed foundation without concrete, each with its own set of advantages.
1. Gravel Shed Base: This method involves creating a level surface using layers of gravel. Start with a layer of coarse gravel for drainage, followed by finer gravel for a smooth surface. Advantages include excellent drainage, easy installation, and the ability to level uneven ground. To enhance stability, consider using a ground grid system filled with gravel, which helps distribute weight evenly and prevents shifting.
2. Paver Base: Concrete or stone pavers can create a solid foundation for your shed. After preparing the ground, lay a bed of sand, then place the pavers tightly together. This method offers flexibility in design and can be easily adjusted or removed if needed. It’s an excellent option for those who want a more aesthetically pleasing base that blends with existing landscaping.
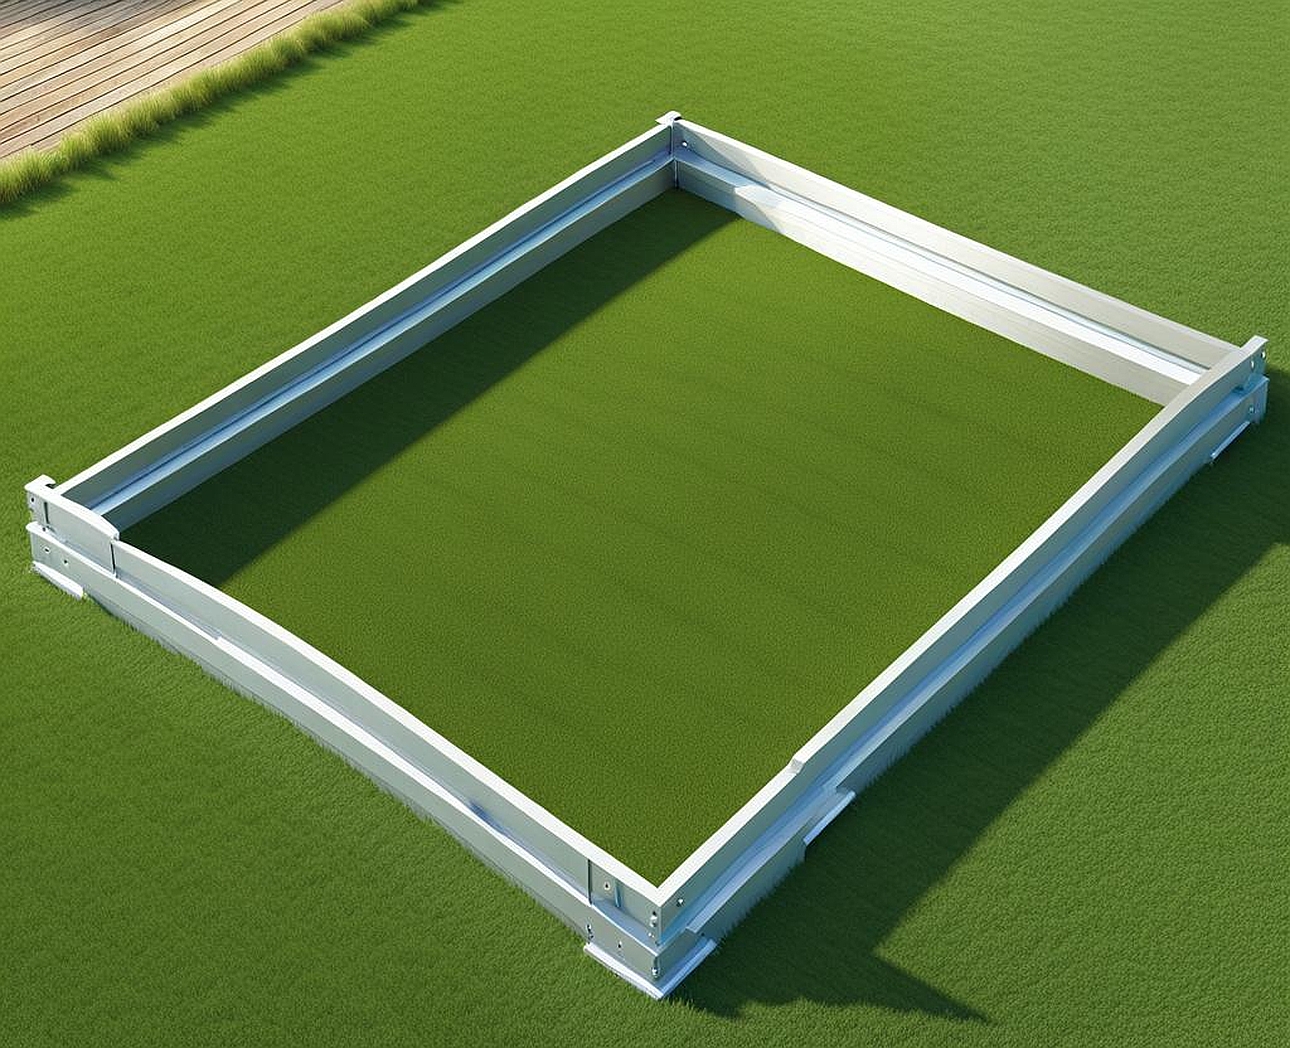
3. Timber Frame Base: Construct a frame using pressure-treated lumber, creating a grid-like structure that sits slightly above the ground. This method works well on uneven terrain and provides good air circulation beneath the shed. Fill the frame with gravel for added stability and drainage. Ensure the timber is rated for ground contact to prevent rot.
4. Plastic Shed Base Kits: These innovative solutions consist of interlocking plastic grids that can be filled with gravel or left open to allow grass growth. They’re lightweight, easy to install, and provide excellent drainage. This option is perfect for those looking for a quick, eco-friendly solution that maintains the natural look of their yard.
5. Concrete Pier Blocks: While not a full concrete slab, pier blocks offer a compromise between stability and ease of installation. Place these pre-cast blocks at key points to support your shed’s frame. This method minimizes ground disturbance and allows for easy leveling adjustments.
When selecting a method for your grass shed foundation, consider factors such as:
- Soil type and drainage in your yard
- The size and weight of your planned shed
- Local climate and weather patterns
- Aesthetic preferences and how the base will blend with your landscaping
- Budget and available time for installation
Each of these methods offers a viable solution for building a shed base on grass without resorting to a full concrete slab. The key is to choose the option that best suits your specific needs and yard conditions. Remember, regardless of the method you choose, proper ground preparation remains crucial for the longevity and stability of your shed base.
By carefully considering these options and matching them to your project requirements, you can create a shed foundation that not only supports your structure effectively but also complements your small yard’s landscape. In the next section, we’ll delve into the installation process and finishing touches for your chosen shed base method.
Once you’ve selected the most suitable method for your grass shed base, it’s time to move forward with the installation process. This crucial phase ensures that your chosen foundation is properly set up to support your shed for years to come. Let’s walk through the steps of installing and finishing your shed base, focusing on key aspects that contribute to its durability and functionality.
Begin by revisiting your ground preparation. Ensure that the area is still level and well-compacted. If you’ve experienced heavy rain since your initial preparation, you may need to re-compact the soil to prevent future settling.
For a gravel shed base:
- Spread your base layer of coarse gravel evenly across the prepared area
- Use a plate compactor to firmly pack this layer
- Add a second layer of finer gravel, leveling it carefully with a rake
- Compact this layer as well, checking for levelness as you go
If you’re using a paver base:
- Lay a weed barrier fabric over the prepared ground
- Spread a layer of sand, about 1 inch thick, and level it carefully
- Place your pavers in your desired pattern, ensuring they fit tightly together
- Use a rubber mallet to seat the pavers firmly
- Fill gaps with sand, sweeping it into the cracks for stability
For a timber frame base:
- Construct your frame using pressure-treated lumber
- Place the frame in position, checking for square corners
- Use a spirit level to ensure the frame is level, adjusting as necessary
- Anchor the frame to the ground using stakes or ground anchors
- Fill the frame with gravel, compacting it in layers
When installing plastic shed base kits:
- Lay out the interlocking panels according to the manufacturer’s instructions
- Secure the panels together, ensuring a tight fit
- If filling with gravel, add it gradually, ensuring even distribution
- For grass-through options, add a layer of topsoil and seed after installation
For concrete pier blocks:
- Mark the positions for your blocks based on your shed’s specifications
- Dig holes for each block, ensuring they’re level with each other
- Place the blocks, checking for level and adjusting with gravel as needed
- Fill around the blocks with compacted soil or gravel for stability
Regardless of your chosen method, take time to double-check the levelness of your completed base. Use a long spirit level or laser level to ensure there are no high or low spots that could affect your shed’s stability.
Once your base is installed, consider adding a moisture barrier. This could be a layer of heavy-duty plastic sheeting or a specialized membrane designed for shed bases. This extra step helps protect your shed from ground moisture, extending its lifespan.
If you’ve opted for a method that allows grass to grow through or around your base, now’s the time to address landscaping. Reseed bare areas around your base, or consider planting low-growing ground cover plants that can help blend your shed base into the surrounding yard.
Finally, give your newly installed shed base time to settle before constructing your shed. This waiting period, typically a few days to a week, allows any minor settling to occur and gives you a chance to make final adjustments if needed.
By carefully executing the installation process and paying attention to these finishing details, you’re ensuring that your grass shed base is not just functional, but also well-integrated into your small yard’s landscape. This solid foundation sets the stage for a durable, long-lasting shed that will serve your storage needs for years to come.
