Shiplap boards have become a cornerstone of modern rustic design, offering a charming blend of simplicity and character to any space. Whether you’re looking to create a cozy farmhouse aesthetic or add texture to a contemporary room, learning how to make shiplap boards can be a game-changer for your home improvement projects.
Understanding Shiplap Boards and Their Popularity
Shiplap boards have a rich history rooted in practical architecture. Originally used in shipbuilding to create a watertight seal, these overlapping wooden planks have sailed into the world of interior design with remarkable popularity. The term “shiplap” refers to the distinctive rabbet or groove cut into the top and bottom edges of wooden boards, allowing them to fit snugly together when installed horizontally or vertically on walls.
Today, shiplap is available in various materials, each offering unique benefits for your DIY projects:
- Wooden Shiplap Boards: The traditional choice, offering authentic charm and the ability to customize with paint or stain.
- MDF Shiplap: A more budget-friendly option that’s smooth and ready for paint, ideal for those seeking a crisp, uniform look.
- Vinyl Shiplap: Perfect for moisture-prone areas, offering durability and easy maintenance.
The surge in shiplap’s popularity can be attributed to its versatility in interior design. It effortlessly complements a wide range of decor styles, from farmhouse chic to modern minimalist. Homeowners and designers alike appreciate shiplap for its ability to:
- Add texture and depth to walls
- Create a focal point or accent wall
- Enhance the perceived height or width of a room
- Provide a neutral backdrop for other design elements
Shiplap decorating ideas are virtually limitless. You might consider installing shiplap as an accent wall behind your bed for a cozy, cabin-like feel. In living rooms, a full wall of shiplap can serve as a stunning backdrop for wall art or a mounted TV. For those looking to incorporate shiplap decor ideas in smaller doses, try using it to frame a fireplace or line the back of built-in shelves.
The rustic appeal of shiplap boards doesn’t mean they’re limited to country-style homes. Contemporary spaces can benefit from the clean lines and subtle texture shiplap provides. Painted in crisp white, shiplap wall paneling can brighten a room and create an airy, modern atmosphere. Alternatively, when stained or left in its natural wooden state, shiplap adds warmth and character to minimalist interiors.
As we delve deeper into the world of shiplap, you’ll discover that making your own boards not only allows for customization but can also be a cost-effective way to achieve this popular look. Let’s explore the materials and tools you’ll need to embark on your DIY shiplap journey.
Materials and Tools Needed for Making Shiplap Boards
Crafting your own shiplap boards is a rewarding DIY project that can significantly enhance your home’s interior. To ensure success, it’s crucial to gather the right materials and tools before you begin. Let’s break down what you’ll need to create beautiful, custom shiplap boards.
Selecting the right wood is paramount when making DIY shiplap boards. The choice of lumber will affect not only the aesthetics but also the durability and ease of installation. Here are some popular options:
- Pine: An affordable and lightweight option, ideal for painting.
- Cedar: Naturally resistant to moisture and insects, perfect for areas with high humidity.
- Oak: Durable and beautiful, great for a more upscale look.
- Poplar: Easy to work with and takes paint well, a good middle-ground option.
When selecting your boards, aim for 1x material (nominally 3/4″ thick) with a width between 5″ and 8″. The grade of lumber you choose will depend on your desired finish. Select grade offers a smoother surface ideal for a refined look, while common grade boards can lend themselves to a more rustic shiplap aesthetic.
Now, let’s talk about the essential tools you’ll need for cutting and installing your shiplap:
- Table saw: For creating the signature shiplap grooves
- Miter saw or circular saw: For cutting boards to length
- Measuring tape and pencil: For accurate measurements and markings
- Level: To ensure straight installation
- Nail gun and nails: For securing boards to the wall
- Sander: To smooth edges and surfaces
- Safety equipment: Goggles, ear protection, and a dust mask
If you’re planning to distress your shiplap boards for a weathered look, you might also want to have these optional materials on hand:
- Hammer or mallet: For creating dents and dings
- Chains or wire brushes: To add texture and wear patterns
- Stains or paints: For achieving the desired color and finish
- Sandpaper of various grits: For smoothing and weathering
When it comes to cost, creating your own shiplap boards can be significantly more economical than purchasing pre-made options. Let’s break down the potential savings:
| Option | Approximate Cost per Square Foot |
|---|---|
| DIY Shiplap (Pine) | $1.50 – $3.00 |
| Pre-made Shiplap | $5.00 – $10.00 |
These prices can vary based on your location and the quality of materials chosen, but generally, making your own shiplap boards can save you 50% or more compared to pre-made options. Plus, the DIY route offers unparalleled customization, allowing you to create shiplap that perfectly fits your space and style.
With your materials gathered and tools at the ready, you’re now prepared to dive into the step-by-step process of crafting your very own shiplap boards. This hands-on approach not only saves money but also gives you the satisfaction of creating a custom feature for your home with your own two hands.
Step-by-Step Process to Make Shiplap Boards
Creating your own shiplap boards is a rewarding process that allows for complete customization of your home decor. Follow these detailed steps to craft beautiful, professional-looking shiplap boards that will elevate any room in your house.
1. Measuring and Cutting the Boards to Size:
- Begin by measuring the wall where you plan to install the shiplap. Calculate the total square footage to determine how much wood you’ll need.
- Using your miter saw or circular saw, cut your boards to the desired length. For a standard 8-foot wall, you might cut your boards to 96 inches, but always measure your specific space.
- If you’re creating a pattern or working around outlets, make sure to account for these in your measurements and cuts.
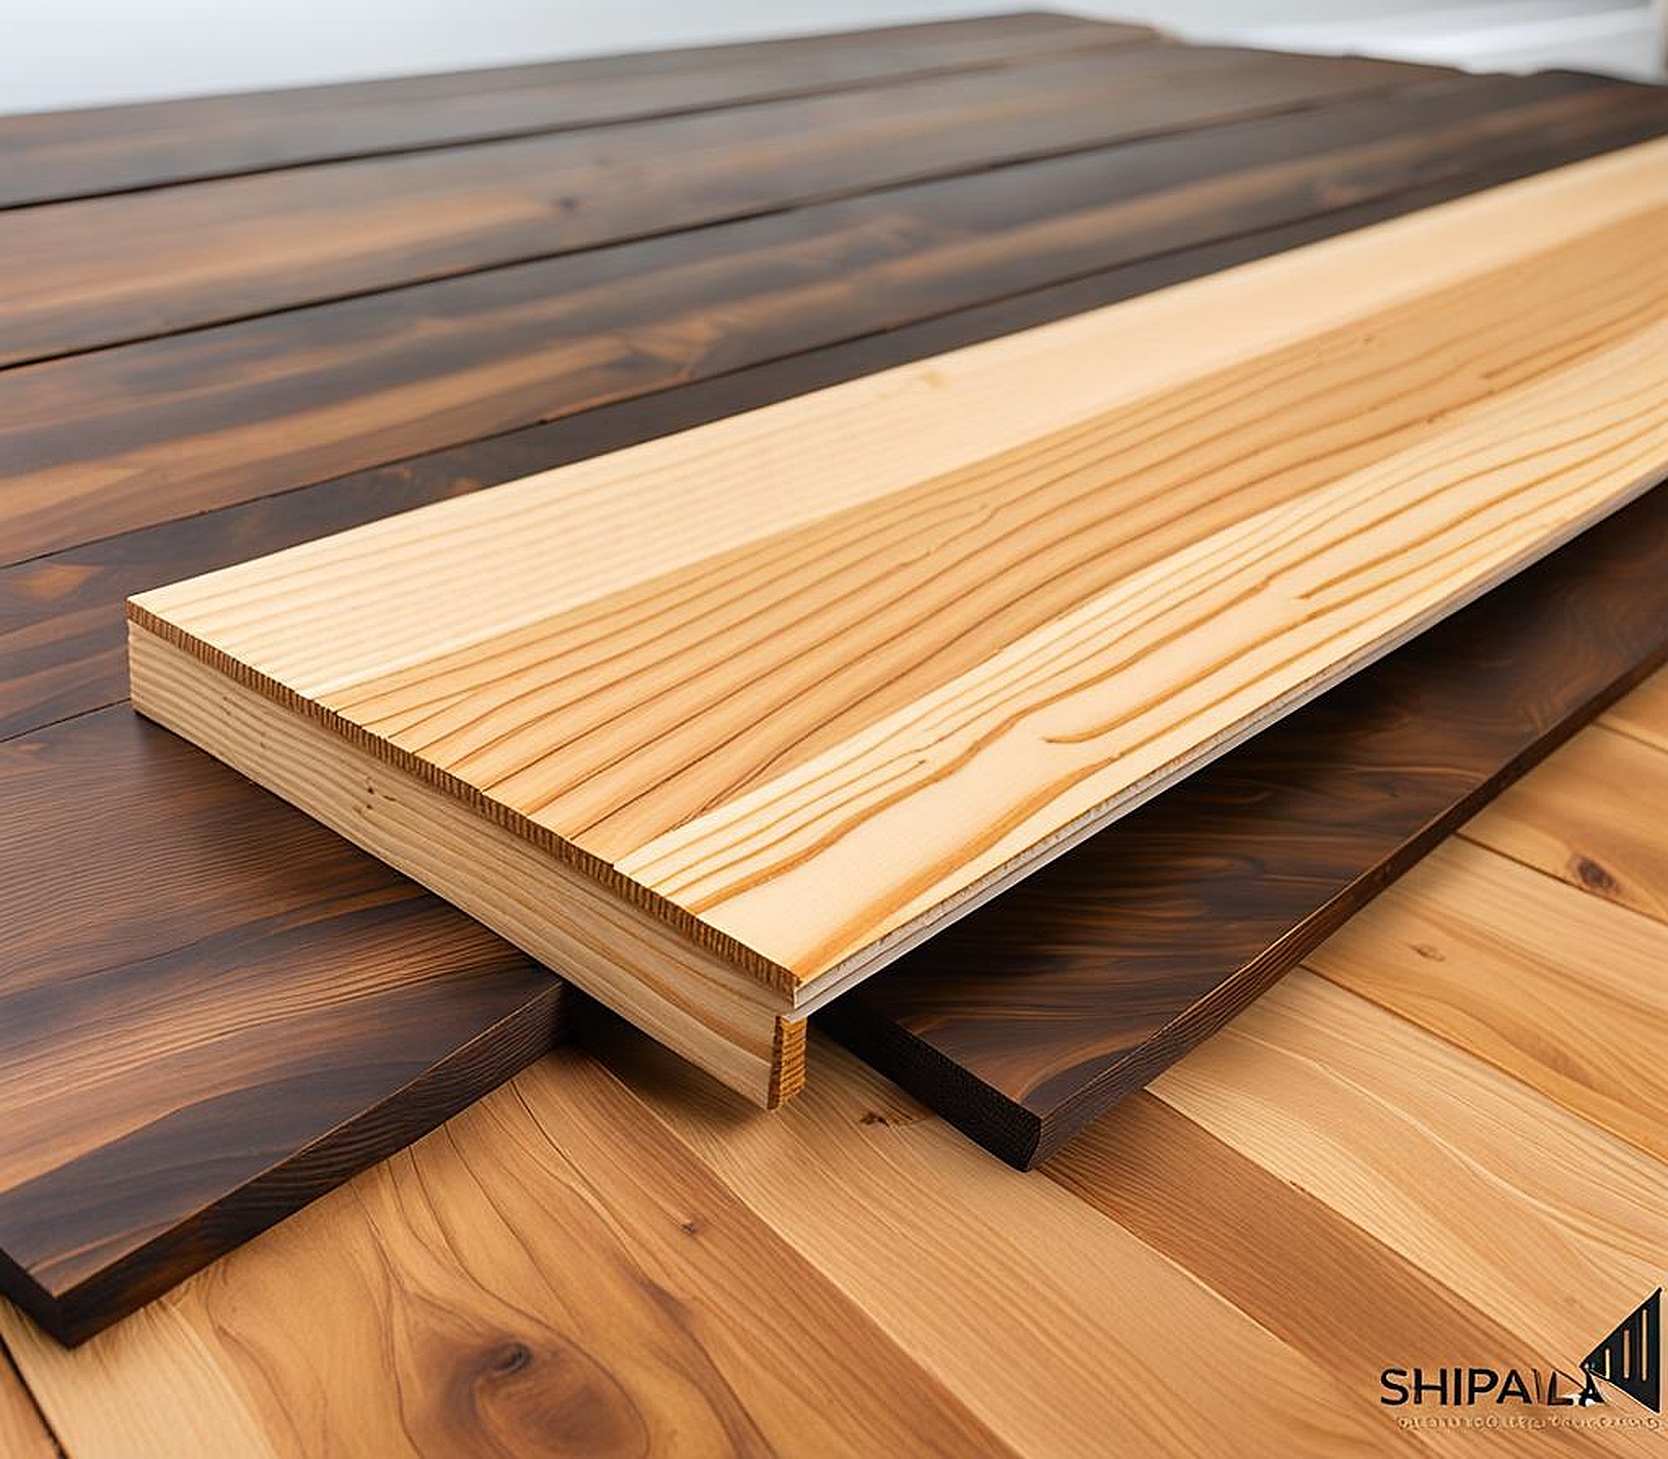
2. Creating the Signature Shiplap Groove:
- Set your table saw blade to cut exactly half the thickness of your board. For a typical 3/4″ board, you’ll set the blade to cut 3/8″ deep.
- Run each board through the table saw twice to create the characteristic “Z” shape of shiplap:
- First cut: Run the board face-down, cutting a rabbet along one long edge.
- Second cut: Flip the board over and run it through again to cut the opposing rabbet on the other long edge.
- This process creates two 3/8″ rabbets on opposing sides, allowing the boards to overlap and fit snugly together when installed.
3. Sanding and Preparing the Boards for Installation:
- Once all boards are cut, use a sander to smooth any rough edges or surfaces. Pay special attention to the cut ends and the newly created rabbets.
- Start with a coarser grit sandpaper (around 80-grit) to remove any major imperfections, then progress to a finer grit (120 or 180) for a smooth finish.
- Wipe down all boards with a tack cloth to remove dust and debris.
4. Techniques for Distressing Shiplap Boards (Optional):
- If you’re aiming for a rustic shiplap look, now’s the time to distress your boards:
- Use a hammer or mallet to create random dents and dings across the surface.
- Drag chains across the boards to create subtle scratch patterns.
- Apply a wire brush in the direction of the wood grain for a weathered effect.
- For painted distressed shiplap boards:
- Apply a base coat of paint and let it dry completely.
- Use sandpaper or a sanding block to wear away paint in high-traffic areas like edges and corners.
- Optionally, apply a contrasting color as a top coat and sand again for a layered, time-worn appearance.
Throughout this process, it’s crucial to maintain consistency in your cuts and distressing techniques to ensure a cohesive look once installed. Remember, the beauty of DIY shiplap boards lies in their handcrafted nature – slight imperfections can add to their charm and character.
As you work, visualize how your shiplap will transform your space. Perhaps you’re creating a shiplap accent wall to serve as a focal point in your living room, or maybe you’re lining an entire bedroom for a cozy, cabin-like atmosphere. The possibilities for shiplap wall art and decor are endless, and by crafting the boards yourself, you’re ensuring a truly unique addition to your home.
With your shiplap boards cut, grooved, and prepared, you’re now ready to move on to the exciting phase of installation and styling. In the next section, we’ll cover how to bring your shiplap vision to life on your walls and explore creative ways to incorporate your handmade boards into your interior design scheme.
Now that you’ve crafted your beautiful shiplap boards, it’s time to bring your vision to life by installing them on your walls. This process requires patience and precision, but the result will be a stunning transformation of your space. Let’s walk through the steps to ensure a professional-looking installation.
Preparing the Wall for Shiplap Installation:
- Start by removing any baseboards, crown molding, or outlet covers from the wall.
- Clean the wall surface thoroughly and repair any holes or imperfections.
- If you’re working with drywall, use a stud finder to locate and mark the wall studs. These will be crucial for secure attachment of your shiplap.
- Consider applying a coat of paint in a complementary color to the wall behind where the shiplap will go. This will ensure that any gaps between boards aren’t glaringly obvious.
Methods for Attaching Shiplap Boards to the Wall:
- Begin at the bottom of the wall, using a level to ensure your first board is perfectly straight. This board sets the foundation for all others, so take your time to get it right.
- Secure the first board using a nail gun, making sure to hit the wall studs for maximum hold. Use finish nails that are long enough to penetrate the drywall and studs securely.
- For the subsequent boards, you have two options:
- Place them directly against each other for a tight fit.
- Use a spacer (like a nickel) between boards to create a small, consistent gap for a more defined look.
- Continue up the wall, checking for level as you go. Use a jigsaw to cut around outlets or other obstacles as needed.
- When you reach the top, you may need to rip (cut lengthwise) the final board to fit the remaining space.
Creating a Shiplap Accent Wall: Tips and Tricks:
- For a striking shiplap accent wall, consider these design ideas:
- Install boards vertically for a modern twist that can make ceilings appear higher.
- Create a pattern by alternating board widths or directions.
- Use shiplap to frame a fireplace or create a built-in headboard effect behind a bed.
- When designing your accent wall, think about balance. If one wall features shiplap, keep adjacent walls simple to avoid overwhelming the space.
- Incorporate shiplap into your overall interior design by coordinating colors and textures with existing decor elements.
Finishing Touches: Painting, Staining, and Decorating Your Shiplap:
- If you’re painting your shiplap:
- Fill nail holes with wood filler and sand smooth once dry.
- Apply a primer designed for wood to ensure even coverage and better paint adhesion.
- Choose a paint finish based on the look you want – matte for a rustic feel or semi-gloss for a more polished appearance.
- Use a small roller or brush to apply paint, being careful to get into the grooves between boards.
- For a natural wood look:
- Sand the boards lightly to open up the grain.
- Apply wood stain according to the manufacturer’s instructions, wiping off excess for an even finish.
- Seal with a clear polyurethane to protect the wood and enhance its natural beauty.
- Decorating your shiplap wall:
- Consider shiplap wall art that complements the linear nature of the boards.
- Use floating shelves to display decor items without disrupting the shiplap pattern.
- Incorporate mirrors or metallic accents to add depth and reflect light in the room.
Remember, your homemade shiplap is more than just a wall treatment – it’s a canvas for your creativity. Whether you’re going for a rustic farmhouse look or a sleek, modern aesthetic, your DIY shiplap boards can adapt to any style. The key is in how you finish and accessorize them.
As you step back and admire your handiwork, take pride in knowing that you’ve not only mastered how to make shiplap boards but also how to transform them into a stunning feature in your home. Your custom shiplap wall is now a testament to your craftsmanship and design vision, ready to be enjoyed for years to come.
