Ever faced a water heater emergency and wished you knew more about that crucial shut off valve on the hot side? You’re not alone. This often-overlooked component plays a vital role in your home’s plumbing system. Understanding its function, installation, and maintenance can save you from potential disasters and costly repairs. Let’s dive into the world of hot side shut off valves and equip you with the knowledge to handle your water heater like a pro.
Understanding the Shut Off Valve on Hot Side of Water Heater
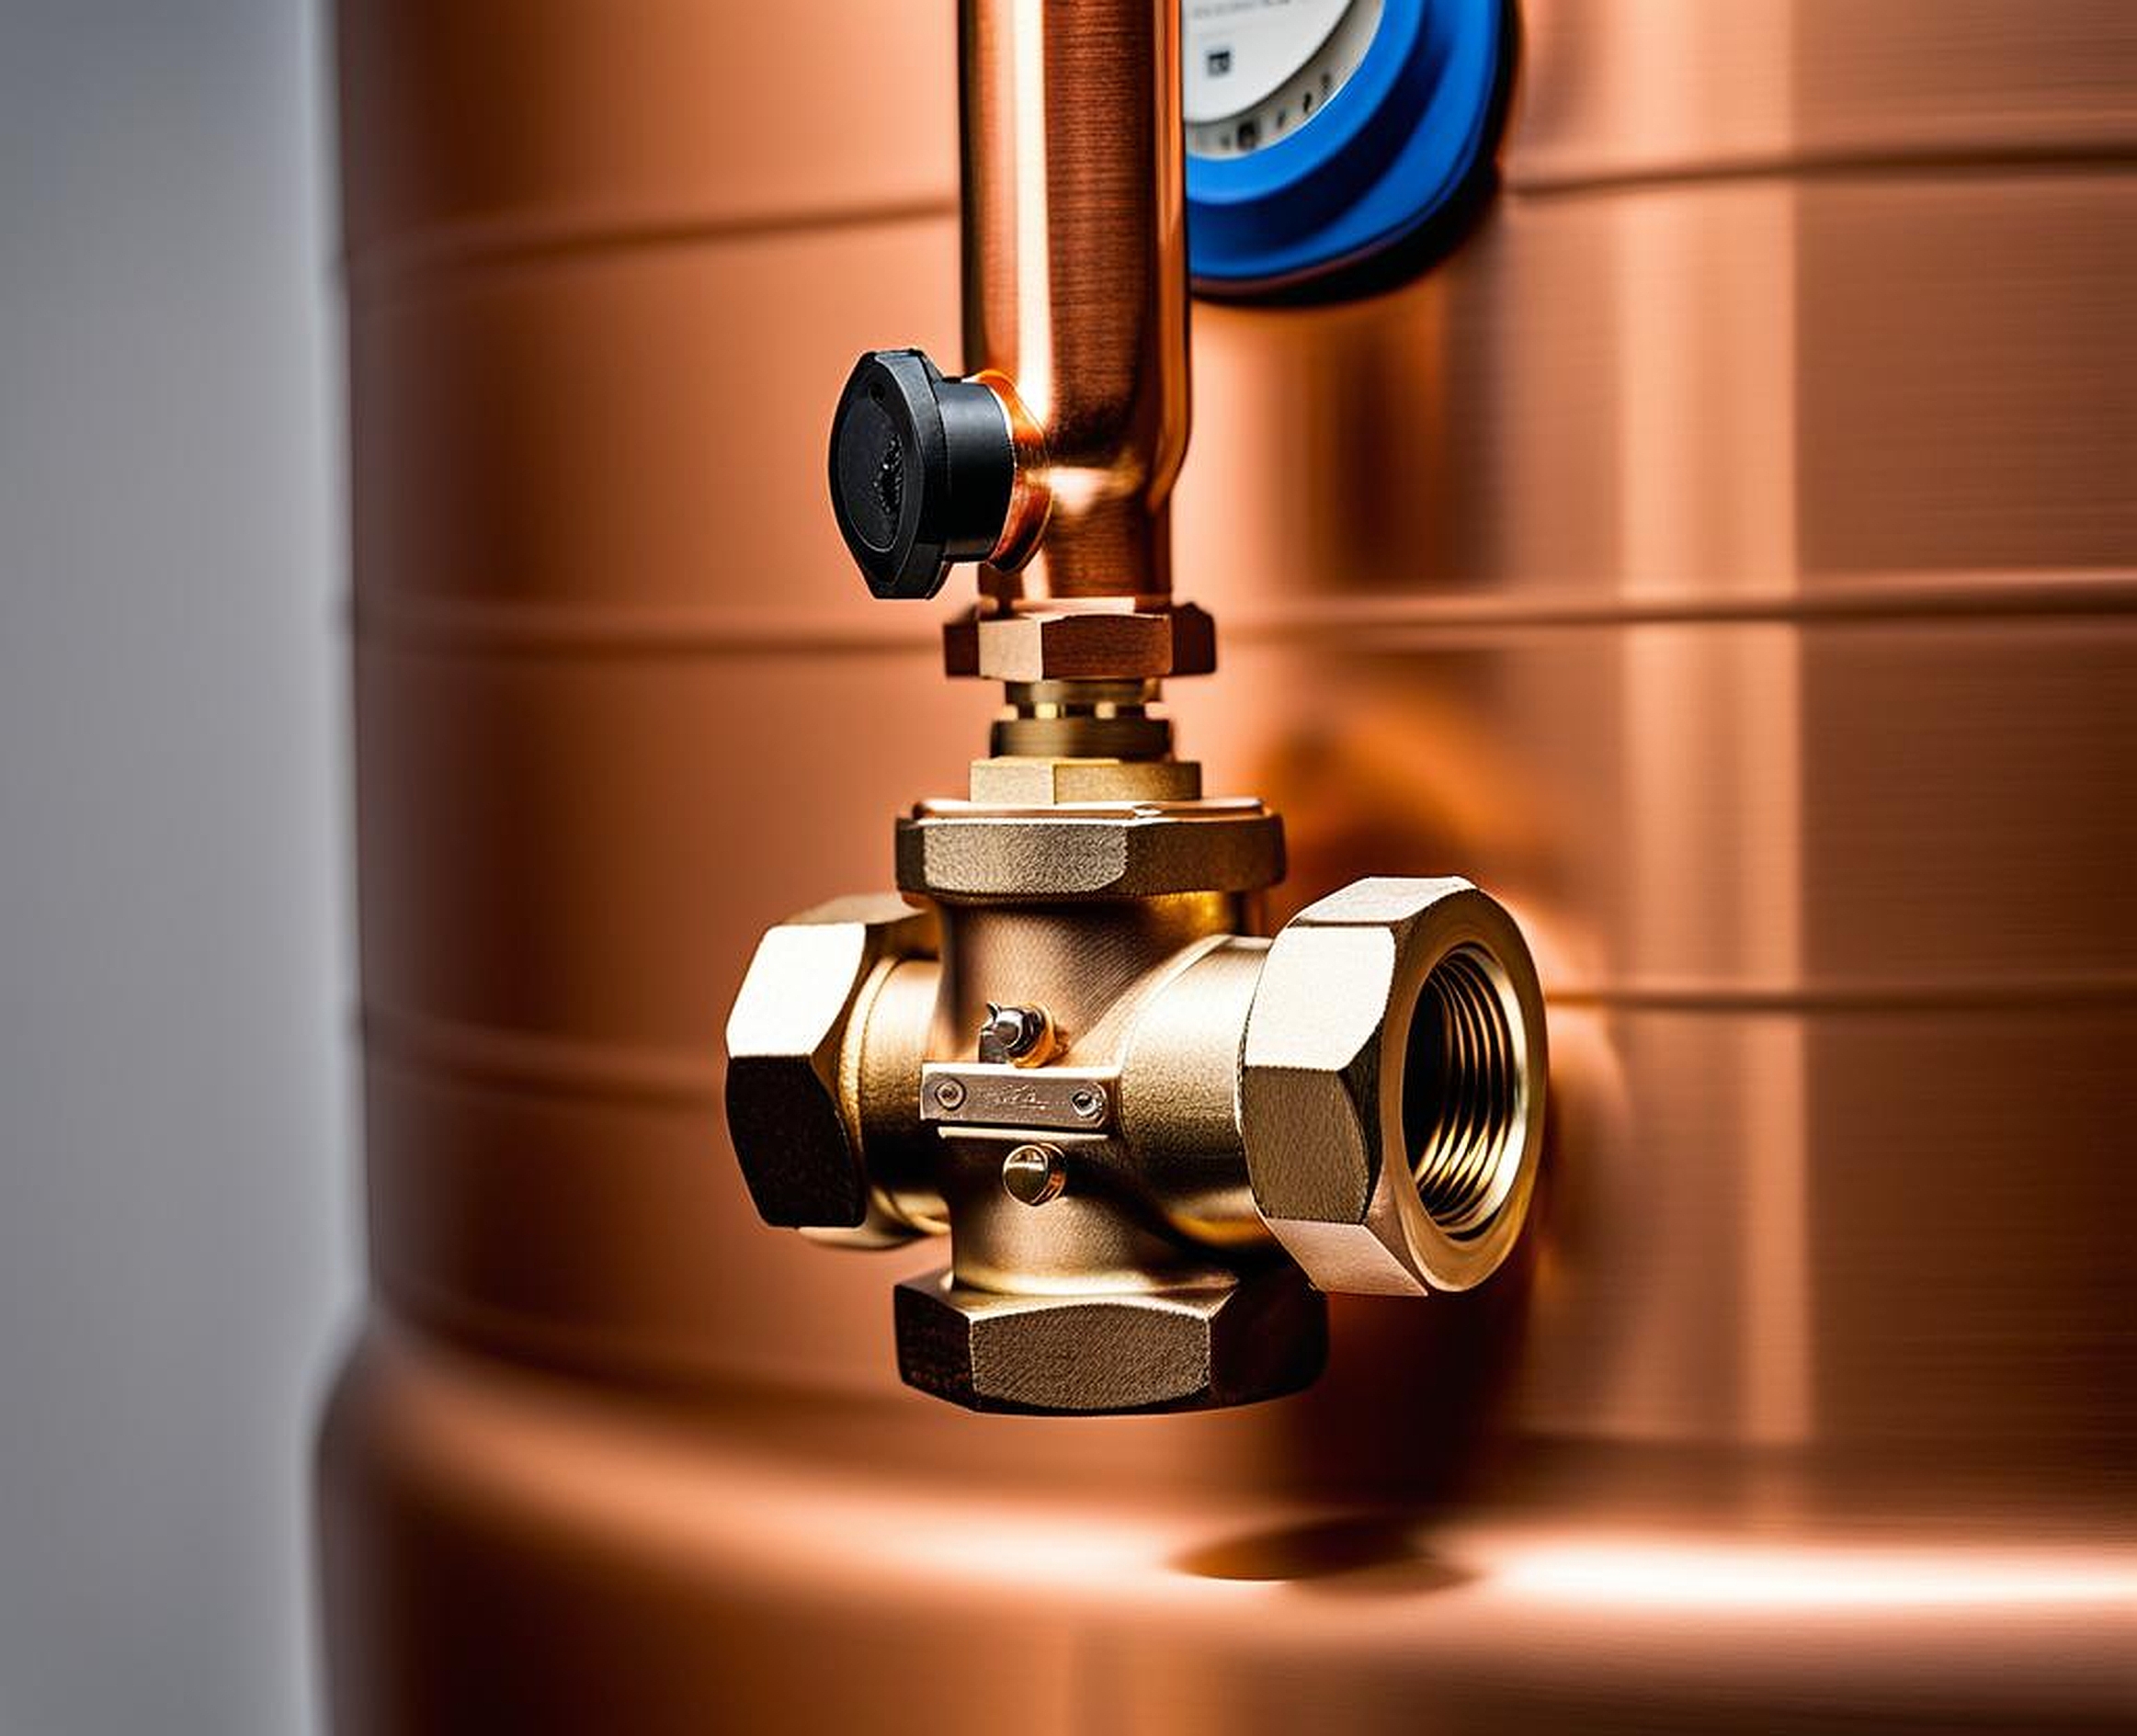
The shut off valve on the hot side of your water heater is a critical component that often goes unnoticed until it’s needed. This small but mighty device serves as a gatekeeper, controlling the flow of hot water from your heater to the rest of your home. It’s not just a simple on-off switch; it’s your first line of defense against potential water damage and a key player in maintaining your water heater.
When we talk about types of shut off valves for water heaters, we’re looking at a range of options. The most common is the gate valve, which uses a metal gate to block water flow when closed. Then there’s the ball valve, featuring a ball with a hole through its center that aligns with the pipe when open. Globe valves are another option, using a disc that lowers onto a seat to stop water flow. Each type has its pros and cons, but all serve the same essential purpose: to give you control over your hot water supply.
The importance of the hot side shut off valve in water heater systems can’t be overstated. It’s your emergency brake when things go wrong. Imagine a scenario where your water heater springs a leak. Without a functioning shut off valve, you’d be scrambling to turn off your home’s main water supply while gallons of hot water flood your space. This valve gives you the power to quickly isolate the water heater, minimizing damage and giving you time to address the issue.
But here’s the kicker – many homeowners don’t even know where to find this crucial valve. Locating the shut off valve on the hot side of your water heater is your first step in mastering your home’s plumbing. Typically, you’ll find it on the outlet pipe coming out of the top of your water heater. This pipe carries the hot water to your fixtures, and the valve is usually within a foot or two of the heater. It might be painted red or have a red handle to indicate it’s on the hot side. If you’re having trouble spotting it, trace the hot water line from your heater – the valve will be the first stop on this pipe’s journey.
| Valve Type | Pros | Cons |
|---|---|---|
| Gate Valve | Durable, Full flow when open | Can be prone to sticking |
| Ball Valve | Quick operation, Clear open/close position | More expensive |
| Globe Valve | Excellent flow regulation | Higher pressure drop |
Remember, knowledge is power when it comes to your home’s plumbing. Knowing where your hot side shut off valve is located and how to operate it can make the difference between a minor inconvenience and a major disaster. Take a moment right now to locate yours – future you will thank you for it!
Installing a Shut Off Valve on Hot Side of Water Heater
Rolling up your sleeves for some DIY plumbing? Installing a shut off valve on the hot side of your water heater might seem daunting, but with the right tools and know-how, it’s a task you can tackle. Let’s break it down step by step, starting with the tools you’ll need.
For this job, your toolbox should include a pipe cutter, adjustable wrench, Teflon tape, and a new shut off valve. Don’t forget safety gear like gloves and safety glasses. If you’re working with copper pipes, you’ll also need a propane torch, solder, and flux. Got everything? Great, let’s move on to the installation process.
First things first, shut off the main water supply to your home and drain the water heater. Safety first, folks! Once that’s done, locate the hot water outlet on top of your heater. This is where you’ll be installing your new valve. Use your pipe cutter to cut the pipe about 6-8 inches above the water heater. Clean the cut ends of the pipe thoroughly.
Now, slide your new shut off valve onto the pipe. If you’re using a compression fitting, tighten the nuts on both sides of the valve. For soldered connections, apply flux to the pipe and valve, then heat and apply solder. Once the valve is securely in place, wrap Teflon tape around the threads of any threaded connections to ensure a watertight seal.
Sounds simple, right? Well, here’s where some common challenges in water heater valve installation might pop up. You might encounter corroded pipes that are difficult to cut or solder. Sometimes, the existing configuration might not leave enough space for the new valve. And let’s not forget the potential for leaks if connections aren’t properly sealed.
If you’re feeling overwhelmed, there’s no shame in calling a plumber for shut off valve installation. In fact, it’s often the smartest move. Professional plumbers have the experience to handle unexpected issues and the tools to get the job done right the first time. They can also ensure your installation meets local building codes – something that’s easy to overlook if you’re not in the trade.
For those brave DIYers out there, here are some tips for proper shut off valve placement and connection. Install the valve as close to the water heater as possible while still leaving enough room to operate it easily. Make sure the valve is oriented correctly – the arrow on the valve should point in the direction of water flow. When tightening connections, be firm but don’t overdo it. Overtightening can damage the valve or fittings.
- Always double-check that your main water supply is off before starting
- Use the right type of valve for your specific water heater and plumbing setup
- Test the valve after installation by turning it on and off a few times
- Look for any signs of leaks and address them immediately
Remember, a well-installed shut off valve on the hot side of your water heater is an investment in your home’s safety and your peace of mind. Whether you choose to DIY or call in the pros, make sure it’s done right. Your future self will thank you when that valve saves the day during a water heater emergency!
You’ve got your shut off valve installed on the hot side of your water heater – great job! But the work doesn’t stop there. Like any part of your plumbing system, this valve needs regular attention to keep functioning properly. Let’s dive into the nitty-gritty of maintaining and repairing your hot side shut off valve.
First up, let’s talk about the signs of a faulty shut off valve on the hot side of water heater. Are you noticing water dripping from the valve even when it’s closed? That’s a red flag. Maybe you’re struggling to turn the valve, or it doesn’t seem to fully shut off the water flow. These are all indicators that your valve might be on its last legs. Don’t ignore these signs – a failing valve can lead to bigger problems down the line.
When it comes to troubleshooting common shut off valve issues, start with the basics. If the valve is hard to turn, it might just need lubrication. A little penetrating oil can work wonders. For leaks, tightening the packing nut (that’s the nut right below the handle) might do the trick. If water is seeping from around the valve stem, replacing the washer or O-ring could solve the problem. Remember, these are temporary fixes – if issues persist, it’s time to consider replacement.
Now, let’s talk DIY maintenance tips for hot water heater valves. The golden rule? Use it or lose it. Valves that sit unused for long periods can seize up. Make it a habit to turn your shut off valve on and off a couple of times a year. This keeps the internal components moving and can prevent mineral buildup. While you’re at it, give the valve a visual inspection. Look for any signs of corrosion or mineral deposits. A little preventive maintenance can go a long way in extending the life of your valve.
But let’s face it – nothing lasts forever. So when should you replace the shut off valve on hot side of water heater? If you’re dealing with persistent leaks, severe corrosion, or a valve that just won’t budge, it’s time for a new one. Also, if your valve is more than 10-15 years old, consider proactive replacement. It’s better to replace it on your terms than to be forced into it during an emergency.
When it comes to the professional water heater valve replacement process, it’s similar to the installation we discussed earlier, but with the added step of removing the old valve. A plumber will shut off the main water supply, drain the necessary pipes, and cut out the old valve. They’ll then clean the pipe ends, install the new valve, and test it thoroughly. The whole process usually takes a couple of hours, depending on the complexity of your setup.
Here’s a pro tip: if you’re replacing your water heater, it’s a perfect time to also replace the shut off valve. Many plumbers will do this automatically, but it’s worth asking to make sure. It’s a small additional cost that can save you headaches down the road.
Remember, your hot side shut off valve is your first line of defense against water heater disasters. Treat it well, and it’ll return the favor when you need it most. Regular maintenance, prompt repairs, and timely replacement are key to keeping your water heater system running smoothly. Don’t wait for a crisis to pay attention to this crucial component – a little care now can prevent big problems later.
