Installing wooden posts into concrete or stone can be a frustrating process. Traditional methods like drilling holes and using lag screws leave visible hardware that detracts from the natural beauty of the wood. Plus, these connections can work loose or corrode over time. For a clean yet robust alternative, consider cement anchors.
Cement anchors provide a discreet and durable way to fasten wooden posts in concrete or stone. The anchor hardware is hidden from view, leaving the wood free of unsightly bolts. When properly installed, cement anchors form an incredibly strong bond that won’t rot, loosen, or corrode. If you need to mount fence posts, deck posts, lamp posts or other wood structures in concrete, cement anchors are the optimal choice.
What are Cement Anchors?
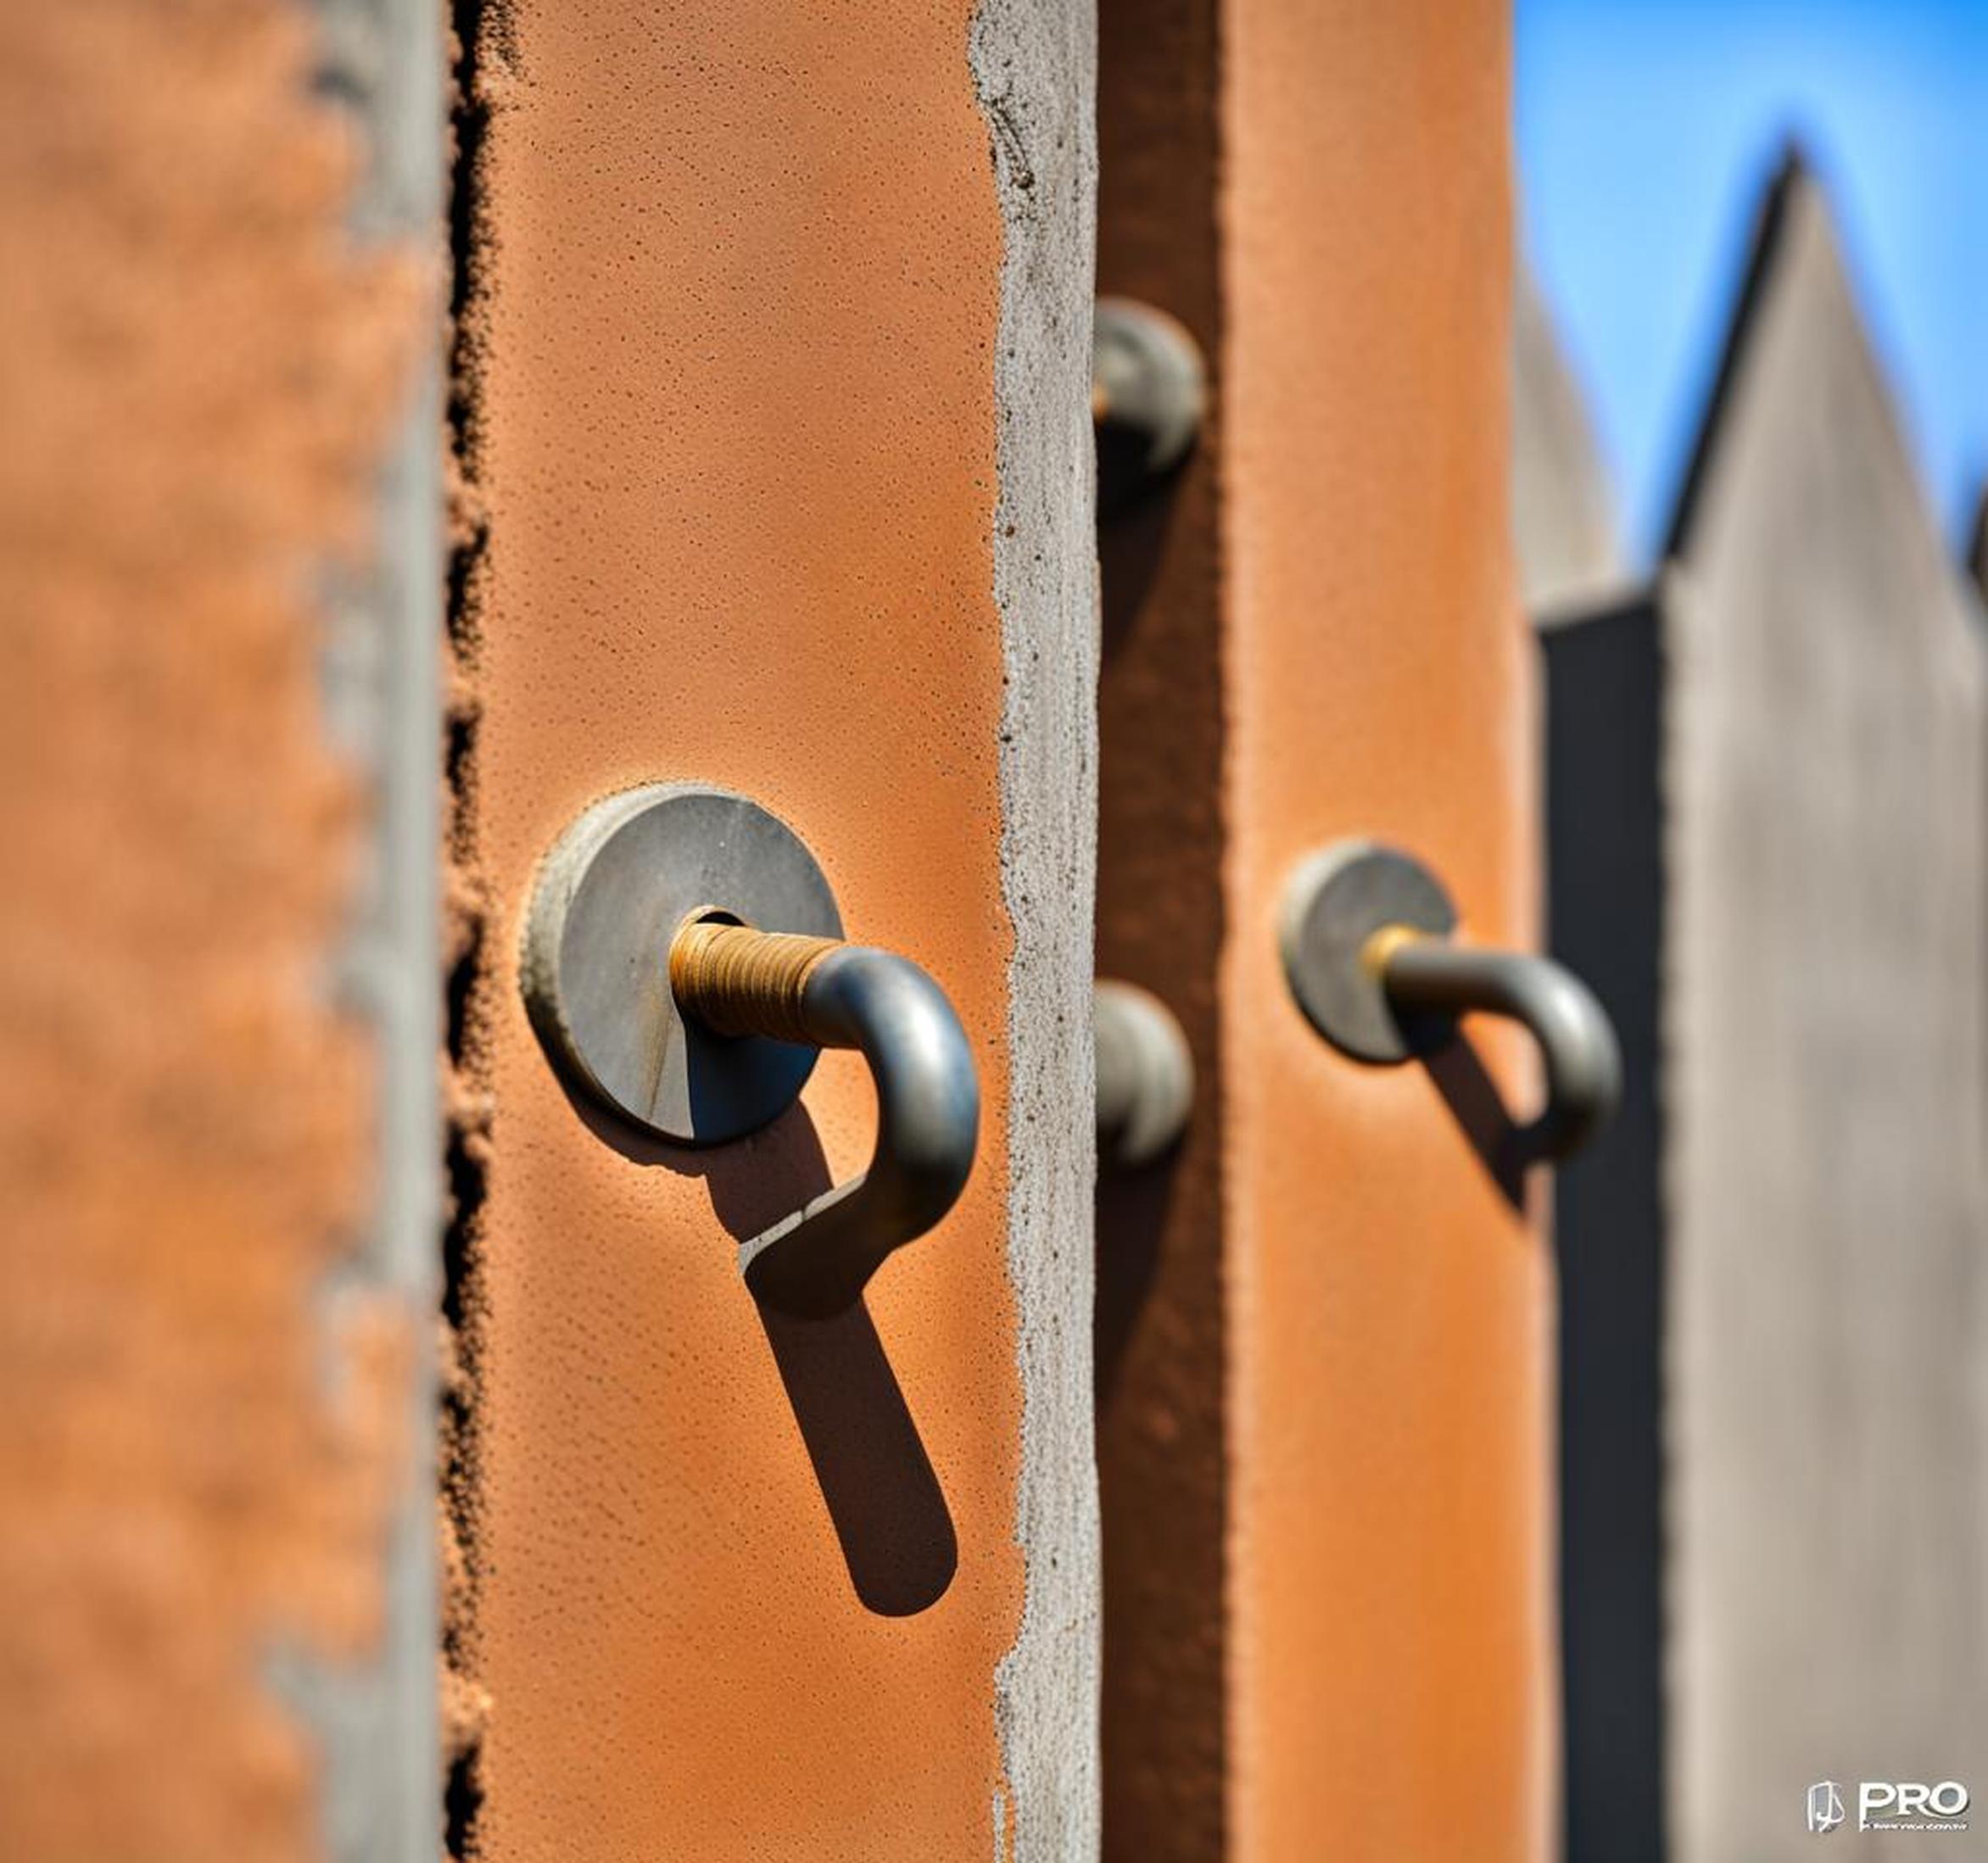
Cement anchors are a specialized type of concrete fastener used to connect building materials like wood posts to concrete or masonry. The main components include:
- All-thread – A threaded rod made of galvanized or stainless steel.
- Epoxy adhesive – A two-part adhesive formula used to bond the anchor in place.
- Collars – Threaded metal collars fit over the all-thread to secure the post.
During installation, the all-thread is secured in a pre-drilled hole using epoxy. As the epoxy cures, it forms an incredibly strong, permanent bond with the concrete. The collar gets twisted onto the exposed threaded end of the all-thread, which squeezes the wood post tightly against the concrete surface.
Advantages of Cement Anchors
Compared to alternatives like sleeve anchors or lag screws, cement anchors offer several notable benefits:
- Discreet connection – No visible fasteners or bulky hardware.
- Very strong bond – Epoxy and all-thread withstand heavy loads.
- Durable – Won’t corrode or deteriorate over time.
- Clean look – Leaves wood posts looking natural.
Typical Applications
Cement anchors are an ideal choice for installing wood posts in outdoor settings like:
- Fence posts
- Deck posts
- Pergola posts
- Sign posts
- Lamp posts
The discreet nature of the hardware keeps these structures looking cohesive and natural. Cement anchors also work well for anchoring posts on uneven stone surfaces.
How to Choose the Right Cement Anchors
With so many cement anchor options available, it’s essential to select the proper type and size for your specific application. Here are some key factors to consider:
Load Capacity
Consider the total load or weight the anchors will need to support. This depends on variables like:
- Size and quantity of posts
- Spacing between posts
- Total span of the structure
Determine the shear and pullout loads involved. Choose anchors appropriately rated for your application’s load requirements.
Type of Concrete
The strength and condition of the concrete or masonry will impact performance. Know whether you’re drilling into standard concrete, high strength concrete, or natural stone. Installation methods and anchor types may vary based on the base material.
Environmental Exposure
Consider moisture levels and potential for corrosion. For example, anchors used in fence posts will see more exposure compared to a covered porch. Opt for galvanized or stainless steel hardware to resist rusting.
Anchor Types
Common cement anchor types include:
- Sleeve anchors – Expands against hole via integral sleeve
- Wedge anchors – Expands pressure via cone-shaped wedges
- Screw anchors – Hardened steel for maximum thread engagement
Match the anchor design to your specific needs. Consider drive type, profile, and composition. Your local hardware store can provide further guidance.
Step-by-Step Installation Process
Installing cement anchors takes a bit more skill than simply driving lag screws. But once you learn the basics, the process is straightforward. Follow these steps:
1. Safety First
When working with drilling and chiseling concrete, be sure to use proper safety gear like gloves, eye protection, and a dust mask. Have a first aid kit on hand.
2. Mark Hole Locations
Determine the exact spot for each anchor based on your project plans. Use a marker or pencil to identify the drilling locations. Measure carefully to achieve proper post spacing and alignment.
3. Drill Pilot Holes
Use a hammer drill and masonry bit to drill perpendicular pilot holes of the required diameter and depth. Clean out debris so anchors seat properly.
4. Prepare Holes
For sleeve anchors, use a chisel to shape holes into a conical profile. This allows the sleeve to fully expand. Follow manufacturer specs.
5. Install Anchors
Squirt epoxy into each hole per the instructions. Insert anchors to the recommended depth. Use a hammer to lightly tap if needed to fully seat anchors.
6. Allow Curing Time
Leave anchors undisturbed while epoxy fully cures. This may take 24 hours or more. Don’t skimp on cure time before loading.
7. Drill Post Holes
Drill corresponding holes in posts to accept anchors. Holes should allow collar flat to rest flush with wood surface.
8. Attach Collars
Slide posts over exposed anchor threads. Hand tighten collars using pipe wrench or driver. Do not overtighten.
Tips for Proper Installation
While cement anchors themselves are robust, improper installation can undermine performance. Keep these tips in mind:
- Follow manufacturer instructions precisely, from hole drilling to epoxy use.
- Drill holes straight and avoid uneven surfaces. Use a bubble level guide.
- Clean dust and debris from holes thoroughly before inserting anchors.
- Ensure collars are flush with post surface and evenly tightened.
- Let epoxy fully cure before applying any load to anchors.
- Visually inspect for proper fit. Tug posts gently to confirm anchors are snug.
Taking the time to drill precise holes and allowing adequate curing makes a big difference. Do not take shortcuts here. Proper installation prevents loosening and failure down the road.
The Many Advantages of Cement Anchors
While the installation process for cement anchors feels more complex than simply driving screws, the benefits are well worth the extra effort:
Discreet Connection
With their hidden hardware, cement anchors allow wood to retain its natural beauty without visible fasteners marring the surface. Posts look attractive rather than cluttered with bolts and brackets.
Superior Strength
The fused combination of epoxy, steel all-thread and concrete forms an incredibly robust connection. Loads are distributed across a wider area compared to screws. Cement anchors won’t loosen or pull out over time.
Durable
Properly installed cement anchors provide permanent connections. The epoxy and steel resist weathering, rotting, and corrosion far better than wood screws or lag bolts.
Flexible Installation
Cement anchors work in both concrete and natural stone surfaces. Their low profile allows installation even in tight spots. Angled drilling enables anchors to fit uneven surfaces.
While cement anchors require more skill to install than simple lag screws, their discreet durability enhances the look and longevity of your wood-to-concrete projects.
Typical Costs and Considerations
In general, expect cement anchors to cost more upfront than basic screws or lag bolts. However, their superior strength and longevity provide more value over the full lifespan of a project. Here are some cost factors to keep in mind:
Hardware Expenses
- All-thread rod: $2 – $4 per foot
- Epoxy tubes: Around $6 per tube
- Collars: $2 – $4 each
Stainless steel and galvanized hardware is more corrosion resistant but costs more than zinc or carbon steel.
Number of Anchors
Costs scale linearly with the number of anchors required. A project with 20 posts will require at least double the number of anchors versus one with 10 posts.
Accessories Add Up
Factor in expenses for rental tools, drill bits, chisels, and safety gear. These can equal or exceed the cost of the anchor hardware itself.
DIY vs Professional Install
Hiring a contractor with proper cement drilling tools and expertise may be worth the extra expense for large or complex projects.
Frequently Asked Questions
Are cement anchors easy to install?
The process involves precision drilling and more steps compared to lag screws. But with proper technique, the right tools, and patience, DIYers can install cement anchors successfully.
How long do cement anchors last?
When installed correctly, cement anchors form permanent connections that last for decades. The epoxy bonds the anchor in place forever.
Can I use cement anchors in cracked concrete?
Wide cracks, crumbling surfaces, or weak concrete can undermine cement anchors. Repair any major cracks before drilling holes for anchors.
What size drill bit do I need?
Consult manufacturer specs for the required drill bit diameter, which depends on factors like anchor size and concrete hardness.
Can I remove/replace cement anchors?
Because the epoxy permanently bonds the anchor, removing existing anchors is extremely difficult. It’s best to install anchors properly the first time.
While lag screws certainly offer a quicker and easier way to secure posts in concrete, their performance is limited. For the cleanest, strongest, longest-lasting connection possible, choose high quality cement anchors installed with care. Take time to drill precise holes and allow the epoxy to fully cure. With attention to detail, you can enjoy durable, discreet anchors securing your wood structures for decades to come.
