A kitchen island from scratch can be used to personalize your space. Learning how to build kitchen island from scratch empowers homeowners to create a custom centerpiece that perfectly fits their needs and style. This comprehensive guide will walk you through the process, from initial planning to final touches, ensuring you have all the knowledge needed to embark on this rewarding project. Whether you’re looking to add extra storage, increase counter space, or create a new focal point in your kitchen, a handmade island is an excellent solution that combines functionality with personal flair.
Planning Your DIY Kitchen Island Project
The foundation of a successful kitchen island build lies in meticulous planning. Before you pick up any tools, it’s crucial to assess your kitchen space and layout. Take precise measurements of the area where you intend to place your island, considering traffic flow and the working triangle between your stove, sink, and refrigerator. This step ensures your new addition enhances rather than hinders kitchen functionality.
Determining the size and functionality of your island is the next critical step. Consider what you want your island to achieve. Do you need extra prep space, additional storage, or a casual dining area? Your answers will guide the dimensions and features of your island. For instance, if you’re planning to include seating, allow for at least 24 inches of width per person and ensure there’s enough overhang for comfortable leg room.
Creating a budget for materials and tools is essential for keeping your project on track. List all necessary items, from lumber and hardware to finishes and any special features you want to incorporate. Don’t forget to factor in the cost of tools you might need to purchase or rent. This budget will help you make informed decisions about materials and design elements.
Sketching initial kitchen island designs is where your creativity comes into play. Start with rough drawings that outline the basic shape and size of your island. As you refine your ideas, create more detailed plans that include measurements, storage layouts, and any special features. These sketches will serve as your blueprint throughout the building process.
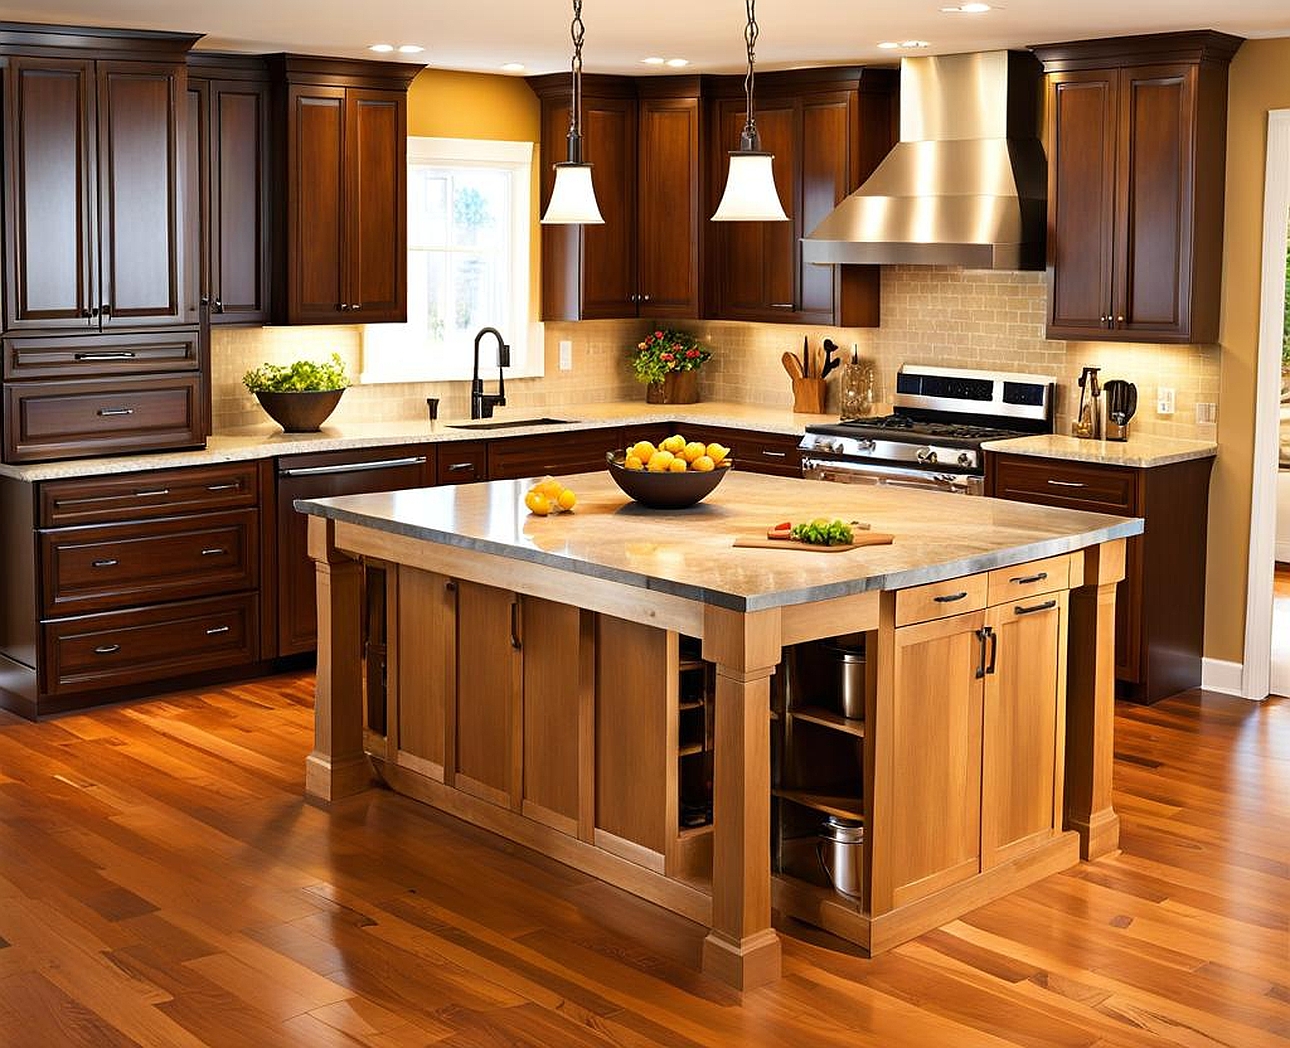
Choosing a style that complements your existing kitchen is crucial for a cohesive look. Your island should feel like a natural extension of your kitchen’s design. Consider matching cabinet styles, coordinating countertop materials, or incorporating elements that tie into your kitchen’s color scheme. This thoughtful approach ensures your handmade kitchen island enhances the overall aesthetic of your space.
Gathering Materials and Tools for Kitchen Island Construction
The success of your DIY kitchen island project hinges on having the right materials and tools at your disposal. Essential building materials typically include wood for the frame and base, plywood or MDF for panels, and your chosen countertop material. The type of wood you select will depend on your budget, desired aesthetics, and the level of durability you need. Hardwoods like oak or maple offer excellent longevity but come at a higher price point, while pine provides a more budget-friendly option that’s still sturdy enough for kitchen use.
For the countertop, options range from butcher block for a warm, natural look to granite or quartz for a more upscale finish. Hardware such as screws, nails, hinges, and drawer slides are also crucial components. Don’t forget to include paint, stain, or varnish in your materials list for the final finish.
The tools required for building a kitchen island can be extensive, but many are common household items. Essential tools include:
- Circular saw or table saw for cutting larger pieces of wood
- Drill and drill bits for creating holes and driving screws
- Measuring tape and level for accurate dimensions and alignment
- Carpenter’s square for ensuring right angles
- Clamps to hold pieces together while working
- Sandpaper or a power sander for smooth finishes
- Paintbrushes or rollers for applying finishes
Selecting the right wood type is crucial for both durability and aesthetics. For the frame and structural elements, consider using hardwoods or high-grade plywood. For visible parts, choose woods that match or complement your existing cabinetry. Reclaimed wood can add character and sustainability to your project, aligning with eco-friendly kitchen island designs.
Sourcing budget-friendly materials for a handmade kitchen island doesn’t mean compromising on quality. Look for sales at local hardware stores, check online marketplaces for secondhand materials, or visit salvage yards for unique, cost-effective options. Some homeowners have successfully repurposed old dressers or cabinets as the base for their islands, significantly reducing costs while adding a unique touch to their kitchen.
Safety equipment considerations are paramount when undertaking any DIY project. Ensure you have safety glasses, work gloves, and a dust mask on hand. If you’re using power tools, hearing protection is also advisable. A first-aid kit should be easily accessible in your work area. Remember, prioritizing safety not only protects you but also ensures a smooth, uninterrupted building process.
Building the Base Structure of Your Kitchen Island
Constructing the frame and support system of your kitchen island is the foundational step that ensures stability and longevity. Begin by creating a base frame using 2×4 lumber. Cut the pieces to size according to your kitchen island plans, ensuring all corners are square. Use a carpenter’s square to check angles, and secure joints with wood screws and construction adhesive for added strength. This frame will serve as the skeleton of your island, supporting the weight of the countertop and any items stored within.
Installing leveling feet is crucial for stability, especially on uneven floors. Attach adjustable leveling feet to the bottom of your frame at each corner and at intervals along the length if your island is particularly large. These allow you to fine-tune the island’s level once it’s in place, ensuring it doesn’t wobble and that drawers and doors operate smoothly.
Adding cross braces for reinforcement is an essential step in building a sturdy kitchen island. Cut additional 2×4 pieces to fit diagonally between the frame’s corners or at regular intervals along its length. These braces prevent the frame from racking (shifting out of square) under weight or during use. Secure them with screws and glue, just as you did with the main frame components.
Creating storage compartments within the base transforms your island from a simple countertop support to a functional piece of kitchen furniture. Measure and cut plywood or MDF sheets to form the bottom, sides, and back of your storage areas. Consider the items you’ll be storing and plan shelf heights accordingly. For drawer spaces, install drawer slides according to the manufacturer’s instructions, ensuring they’re level and properly aligned for smooth operation.
Attaching side panels and trimming for a finished look elevates your DIY kitchen island from functional to beautiful. Cut panels to size from your chosen material, whether it’s plywood, MDF, or even reclaimed wood for a rustic touch. Attach these panels to the frame using finish nails and adhesive, ensuring they’re flush and square. For a polished appearance, add trim pieces around the base and any exposed edges. This not only covers any rough edges but also provides an opportunity to tie your island’s design into your existing kitchen cabinetry.
Crafting Custom Storage Solutions for Your Island
Designing and building drawers for utensil storage is a practical way to maximize your kitchen island’s functionality. Start by measuring the openings in your island base and subtract about 1/4 inch from each dimension to allow for smooth operation. Construct drawer boxes using 1/2-inch plywood, joining the sides with dovetail joints for strength or simple butt joints secured with wood glue and brad nails for a simpler approach. Attach drawer fronts that match or complement your island’s aesthetic, and install drawer pulls or knobs for easy access.
Installing shelves for cookbook display or additional storage adds versatility to your island. Cut shelves to size from 3/4-inch plywood or solid wood, depending on your design preferences. For adjustable shelving, install shelf standards vertically inside the cabinet and use shelf clips to support the shelves. This allows for easy reconfiguration as your storage needs change. For a more permanent solution, secure shelves directly to the cabinet sides using wood screws and supports.
Creating a space for a built-in trash bin is a clever way to keep your kitchen tidy and maximize floor space. Measure your preferred trash can and design a pull-out drawer or tilt-out door to accommodate it. Install full-extension drawer slides rated for the weight of a full trash bin to ensure smooth operation. For a tilt-out design, use piano hinges along the bottom edge of the door for durability.
Adding a wine rack or beverage cooler area can transform your kitchen island into an entertainment hub. For a simple wine rack, create a grid of square openings sized to hold wine bottles securely. If opting for a beverage cooler, ensure you plan for proper ventilation and electrical connections during the initial build phase.
Incorporating a towel bar or hooks for convenience is a small detail that can significantly enhance your island’s utility. Choose a location that’s easily accessible but won’t interfere with seating or workspace. Install a towel bar on the end panel of your island or add hooks inside cabinet doors for a hidden storage solution. This keeps kitchen towels within reach but out of sight when not in use.
Installing the Countertop and Finishing Touches
Selecting and cutting the countertop material is a crucial step that significantly impacts your kitchen island’s functionality and appearance. Whether you choose butcher block, granite, quartz, or another material, ensure it complements your kitchen’s existing design while meeting your practical needs. For materials like butcher block or laminate, you may be able to cut and install the countertop yourself. However, stone countertops often require professional cutting and installation to ensure a perfect fit and finish.
Attaching the countertop securely to the base is essential for safety and longevity. For wooden countertops, use L-brackets screwed into the base frame and the underside of the countertop. With stone countertops, a professional installer will typically use a silicone adhesive to secure the top to the base. Ensure the base is level before installation to prevent stress points that could lead to cracks or separations over time.
Adding a decorative edge or overhang enhances both the aesthetics and functionality of your island. An overhang on one side can create a comfortable seating area, typically extending 10-12 inches for standard counter height or 15-18 inches for a raised bar area. For wooden countertops, you can route the edges to create profiles like bullnose or ogee for a polished look. Stone countertops often come with edge options that can be specified during ordering.
Installing a sink or cooktop in your island can significantly increase its utility. If you’re planning for either, ensure you’ve made provisions for plumbing or electrical connections during the base construction phase. For a sink, cut the hole according to the manufacturer’s specifications and use a waterproof sealant around the edges. Cooktop installation similarly requires precise cutting and may necessitate additional ventilation considerations.
Applying final finishes is the last step in bringing your kitchen island to life. For wooden elements, sand all surfaces smooth, progressing from coarser to finer grits. Apply your chosen stain, if using, following the grain of the wood and allowing proper drying time between coats. Finish with several layers of polyurethane for durability, especially on the countertop. For painted surfaces, use a high-quality primer followed by cabinet-grade paint for a lasting finish. This attention to detail in the finishing process ensures your handmade kitchen island not only looks professional but also stands up to the rigors of daily use.
Adding a breakfast bar with seating transforms your kitchen island from a simple workspace into a social hub. When designing this feature, consider the height of your countertop and choose appropriate stools or chairs. Standard counter height is 36 inches, requiring 24-26 inch stools, while a bar-height counter (42 inches) needs 30-inch stools. Ensure you provide enough knee space (about 15 inches) and overhang (10-12 inches) for comfortable seating. This addition not only increases functionality but also creates a casual dining area perfect for quick meals or entertaining guests while cooking.
Incorporating electrical outlets for appliances is a practical enhancement that significantly boosts the utility of your kitchen island. Plan the placement of outlets carefully, considering where you’re most likely to use small appliances or charge devices. Install GFCI (Ground Fault Circuit Interrupter) outlets to comply with electrical codes for kitchen areas. If your island includes a cooktop or other built-in appliances, ensure you work with a licensed electrician to safely wire these features according to local building codes.
Installing under-cabinet lighting adds both functionality and ambiance to your kitchen island. LED strip lights are an excellent, energy-efficient option that’s easy to install. Place them along the underside of any overhanging countertop or beneath shelves to illuminate work areas or display items. For a more dramatic effect, consider color-changing LED strips that can adjust the mood of your kitchen with the touch of a button. Remember to plan for the power source during the construction phase, potentially running wires through the island’s base.
Creating a pull-out cutting board or work surface is a clever way to maximize workspace without permanently expanding your island’s footprint. Design a custom-sized cutting board that slides out from a discrete slot in your island. Use heavy-duty drawer slides rated for the weight of the board plus typical use. For added versatility, consider making one side of the board suitable for cutting and the other finished as a serving surface for entertaining.
Customizing with decorative corbels or molding can elevate the aesthetic of your kitchen island, transforming it from a purely functional piece to a statement feature in your kitchen. Corbels can be installed under an overhanging countertop to provide both support and visual interest. Choose designs that complement your kitchen’s overall style, whether that’s ornate for a traditional look or sleek for a modern space. Crown molding along the top edge of the island’s base can tie it visually to your existing cabinetry, creating a cohesive look throughout the kitchen.
By incorporating these unique features, your DIY kitchen island becomes more than just additional counter space–it evolves into a multifunctional centerpiece that enhances both the practicality and beauty of your kitchen. Remember, the key to successful kitchen island projects lies in balancing functionality with design, ensuring that every added feature serves a purpose while contributing to the overall aesthetic of your space. With careful planning and execution, your handmade kitchen island will stand as a testament to your craftsmanship and creativity, providing years of use and enjoyment in the heart of your home.
