Ready to transform your kitchen with a stylish and durable flooring option? Installing vinyl plank flooring in your kitchen is a game-changer. This practical guide will walk you through the process, from preparation to finishing touches. We’ll cover everything you need to know about kitchen flooring installation, focusing on vinyl planks – a popular choice for its resilience and aesthetic appeal. Let’s dive into the world of kitchen flooring solutions and get your new floor looking fantastic!
Preparing Your Kitchen for Vinyl Plank Flooring Installation
Before we jump into the nitty-gritty of installing vinyl flooring, it’s crucial to properly prepare your kitchen. This preparation phase is often overlooked, but it’s the foundation for a successful installation. Let’s break down the key steps to ensure your kitchen is primed and ready for its new vinyl plank flooring.
First things first, you’ll want to assess your current kitchen floor. Take a good look at what you’re working with. Is it tile, hardwood, or old vinyl? Each type of existing flooring presents its own challenges. For instance, if you’re dealing with old vinyl, you might need to remove it completely, especially if it’s damaged or uneven. Remember, vinyl plank flooring is a floating floor, which means it needs a smooth, level surface to sit on.
Speaking of level surfaces, this is a critical point in your preparation. Your subfloor should be level within a quarter inch across the entire kitchen. If you’ve got high spots, you might need to sand them down. Low spots? Fill them in with a self-leveling compound. Trust me, taking the time to get this right will save you headaches down the road.
Now, let’s talk tools and materials. You’ll need quite a few items for this project, so it’s best to gather everything before you start. Here’s a quick list:
- Vinyl plank flooring (obviously!)
- Underlayment (if recommended by the manufacturer)
- Utility knife
- Measuring tape
- Spacers
- Tapping block
- Pull bar
- Hammer or rubber mallet
- Saw (circular or jigsaw for more intricate cuts)
Don’t forget to order about 10-15% more flooring than your square footage calculations suggest. This extra material accounts for waste from cuts and potential mistakes. It’s always better to have a bit too much than to run short mid-project!
Accurate measurements are crucial for a successful kitchen flooring installation. Measure your kitchen space carefully, accounting for every nook and cranny. Pay special attention to areas around cabinets, islands, and appliances. These spots often require special cuts and can be tricky if not properly planned for.
With your measurements in hand, it’s time to remove the existing flooring. This can be a bit of a workout, but it’s necessary for achieving the best results with your new vinyl planks. If you’re removing tile, be prepared for some dust and noise. For hardwood, you might need to rent a floor scraper to make the job easier. As you remove the old flooring, keep an eye out for any damage to the subfloor. This is your chance to address any issues before laying down the new vinyl planks.
Once the old flooring is out, give your subfloor a thorough cleaning. Sweep and vacuum to remove all debris. If there are any nails or staples left behind, remove them and fill the holes. A clean, smooth subfloor is essential for your vinyl plank flooring to lay correctly and last for years to come.
Lastly, don’t forget to acclimate your vinyl planks to the room temperature. This step is often overlooked but is crucial for preventing expansion or contraction after installation. Simply leave the boxes of vinyl planks in the kitchen for at least 48 hours before installation. This allows the material to adjust to the temperature and humidity of the room, reducing the risk of gaps or buckling after installation.
By following these preparation steps, you’re setting yourself up for success in your kitchen flooring project. A well-prepared space makes the actual installation process much smoother and helps ensure a beautiful, long-lasting result. Now that we’ve got the prep work covered, let’s move on to the exciting part – actually installing your new vinyl plank flooring!
Step-by-Step Guide to Installing Vinyl Plank Flooring in Your Kitchen
Now that your kitchen is prepped and ready, it’s time to dive into the heart of the matter – installing your vinyl plank flooring. This process might seem daunting at first, but with a systematic approach, you’ll find it’s quite manageable. Let’s break it down into easy-to-follow steps.
First up is planning your layout. The direction you lay your planks can have a big impact on the overall look of your kitchen. Generally, it’s recommended to install vinyl planks parallel to the longest wall in the room. This creates a sense of flow and can make your kitchen appear larger. However, if you have a focal point in your kitchen, like a large window or a feature wall, you might want to consider laying the planks perpendicular to it for added visual interest.
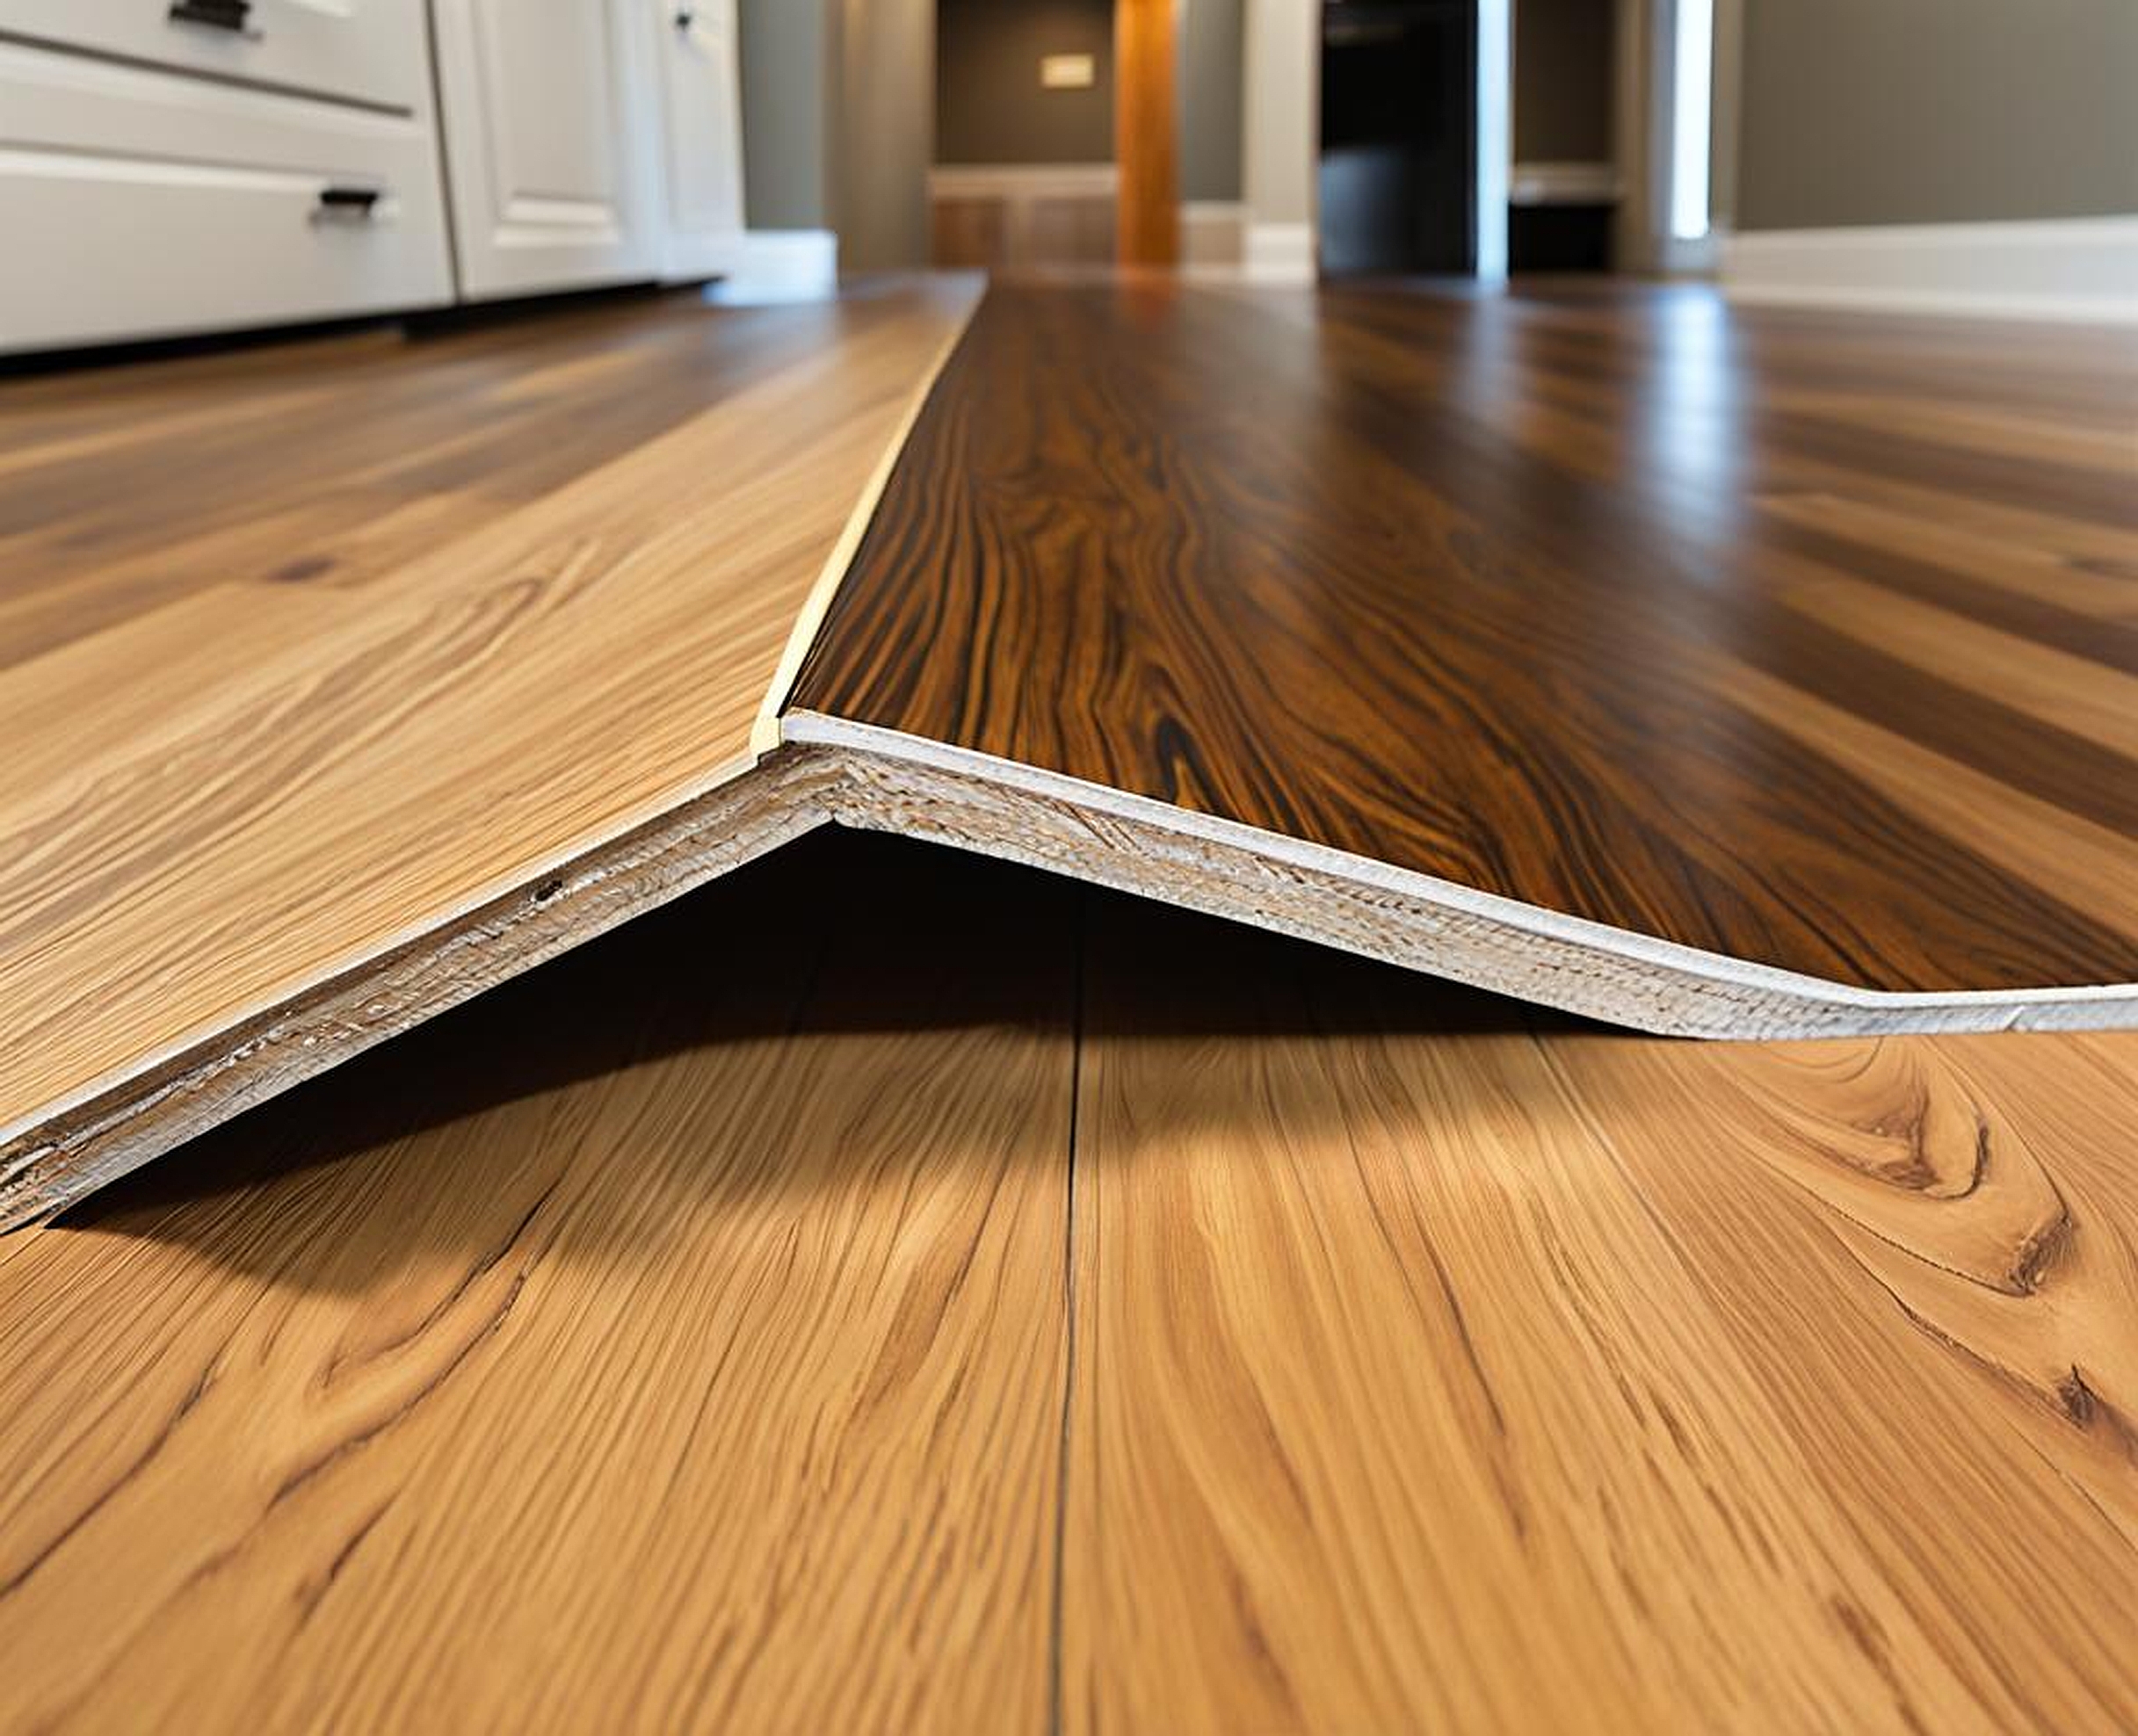
Before you start laying planks, you need to decide if you’re going to use an underlayment. While not always necessary with vinyl plank flooring, an underlayment can provide additional comfort underfoot and improve sound insulation. If your vinyl planks don’t have a pre-attached underlayment, I recommend using one, especially in a busy area like the kitchen. Roll out the underlayment across the entire floor, butting the edges together without overlapping. Tape the seams with the recommended tape to create a smooth, continuous layer.
Now, it’s time to start laying your first row of vinyl planks. This is arguably the most important row, as it sets the stage for the entire installation. Begin in the left corner of the room, with the tongue side of the plank facing the wall. Use spacers along the wall to maintain a consistent expansion gap – usually about 1/4 inch. This gap allows for natural expansion and contraction of the flooring with temperature changes.
As you lay the first row, you’ll likely need to cut the last plank to fit. Measure the distance from the end of the last full plank to the wall, subtract the width of your expansion gap, and cut the plank to size. A utility knife works well for straight cuts, but for more complex cuts around door frames or cabinets, you might need to use a jigsaw.
With your first row in place, it’s time to continue across the kitchen floor. Start the second row with a plank cut to about 2/3 its original length. This staggers the seams, creating a more natural look and improving the floor’s stability. To connect the planks, angle the tongue of the new plank into the groove of the plank in the previous row at about a 45-degree angle. Lower it into place and press down firmly. You should hear a satisfying click as it locks into place.
As you work your way across the room, you’ll encounter obstacles like cabinets, islands, and appliances. These require special attention and often some creative cutting. For cabinets, you’ll need to undercut the door frames and trim to allow the flooring to slide underneath. This creates a seamless look and proper expansion space. For islands and appliances, measure carefully and cut your planks to fit around these fixtures, always maintaining that crucial expansion gap.
One of the trickier aspects of kitchen vinyl plank installation is dealing with doorways and transitions to other flooring types. For doorways, you’ll need to cut the planks to fit under the door frame. A jamb saw can be helpful for this task. As for transitions to other flooring types, you’ll need to use transition strips. These come in various styles to accommodate different height differences and provide a smooth transition between your new vinyl plank flooring and the adjacent flooring.
Throughout the installation process, it’s crucial to regularly check your work. Step back and look at the overall pattern. Are your seams staggered properly? Are your rows staying straight? It’s much easier to make adjustments early on than to realize there’s a problem when you’re nearly finished.
Remember, patience is key when installing vinyl plank flooring in your kitchen. Take your time, especially with cuts and tricky areas. If a plank doesn’t seem to be fitting correctly, don’t force it. Instead, remove it and check for debris or issues with the locking mechanism. A properly installed vinyl plank floor should fit together smoothly without gaps or lippage between planks.
By following these steps, you’ll be well on your way to a beautifully installed vinyl plank floor in your kitchen. The process might take a day or two, depending on the size of your kitchen and your level of experience, but the result will be worth it. In the next section, we’ll cover the finishing touches that will really make your new kitchen floor shine.
Congratulations! You’ve laid the last plank, and your new kitchen floor is taking shape. But before you break out the champagne, there are a few finishing touches to address. These final steps will not only complete the look of your new vinyl plank flooring but also ensure its longevity and performance.
First on the list is installing baseboards and trim. These elements provide a polished look, covering the expansion gap you’ve so carefully maintained around the room’s perimeter. If you removed your old baseboards carefully, you might be able to reinstall them. Otherwise, this is a great opportunity to update your kitchen’s look with new baseboards. When installing, make sure to nail the baseboards to the wall, not the flooring. This allows the vinyl planks to expand and contract freely.
For a truly finished look, consider adding quarter round molding at the base of your baseboards. This small detail can make a big difference, especially if there are any slight gaps between the baseboard and the flooring. Choose a quarter round that matches either your baseboards or your new flooring for a cohesive look.
Next, let’s talk about sealing edges and joints. While vinyl plank flooring is inherently water-resistant, kitchens can be prone to spills and splashes. To give your floor extra protection, consider applying a bead of silicone caulk along the edges where your flooring meets fixed objects like cabinets or appliances. This creates a waterproof barrier, preventing moisture from seeping underneath your new floor.
Now that your floor is installed and sealed, it’s time to think about maintenance. One of the great things about vinyl plank flooring is how easy it is to clean and care for. For day-to-day cleaning, a simple sweep or vacuum (using the hard floor attachment) will suffice. For deeper cleaning, use a damp mop with a cleaning solution specifically designed for vinyl floors. Avoid using harsh chemicals or abrasive cleaners, as these can damage the protective layer on your vinyl planks.
To keep your new kitchen floor looking its best, it’s important to protect it from scratches and dents. Place felt pads under the legs of furniture and appliances to prevent scratching when they’re moved. If you have rolling chairs or carts in your kitchen, consider using a plastic mat underneath to distribute the weight and prevent indentations in the flooring.
Despite your best efforts, you might encounter some issues with your vinyl plank flooring over time. Don’t worry – most problems have simple solutions. If you notice a plank starting to lift at the edge, you can usually fix it by applying some pressure to snap it back into place. For more stubborn issues, a bit of vinyl floor adhesive can work wonders.
If a plank becomes damaged beyond repair, one of the advantages of vinyl plank flooring is that you can replace individual planks without tearing up the entire floor. Simply cut out the damaged plank (being careful not to harm surrounding planks), and snap a new one into place. It’s a good idea to keep a few extra planks from your original installation for just such occasions.
Lastly, remember that while vinyl plank flooring is highly durable, it’s not indestructible. Avoid dragging heavy objects across the floor, and clean up spills promptly to prevent staining. With proper care and maintenance, your new kitchen vinyl plank floor can look beautiful for many years to come.
Installing vinyl plank flooring in your kitchen is a rewarding project that can dramatically transform the space. From the initial preparation to the final touches, each step plays a crucial role in creating a beautiful, durable floor that will serve you well for years to come. Whether you’re a seasoned DIY enthusiast or a first-time flooring installer, with patience, attention to detail, and the right tools, you can achieve professional-looking results. Enjoy your new kitchen floor!
